Now that you have your own WordPress hosting, it is time to install WordPress.
WordPress have always been excited to let you know that installing WordPress can be done within 5 minutes. You can be up and running and it is very easy to do once you know how.
This tutorial will take you step by step through installing and setting up WordPress. It will cover the three most common methods of installing WordPress.
First we will install WordPress on cPanel’s Softaculous installer for hosted websites. Then we will install WordPress manually on a hosting server for those that do not have any easy WordPress installers on their server. Finally, we will cover how to install WordPress on our local machine for designers and developers to take advantage of.
[latest_deal length=”full”]
Steps to take before installing WordPress
Before you install WordPress online, you need to purchase a domain name so that people will be able to reach your website. You also need WordPress hosting so that your website can be administered.
When it comes to WordPress hosting, we recommend Bluehost if you are just getting started or WP Engine if you need a little bit more power.
This tutorial is rather large and certain parts may not apply to you so use the below links to skip to the relevant sections.
[table_of_contents]
- How to install WordPress using Softaculous
- How to install WordPress manually using FTP
- How to install WordPress on my computer
- What to do after installing WordPress
[/table_of_contents]
How to install WordPress using Softaculous
 Softaculous is a popular and easy to use web application installer script. It allows you to install a number of popular content management systems like WordPress.
It is pre-installed on many popular WordPress hosting providers such as [eafl id=”57″ name=”Siteground” text=”SiteGround Hosting”].
Using Softaculous makes installing WordPress extremely simple.
-
cPanel Login
Log into your hosting providers cPanel with your username and password. You will have gotten these details in an email when you signed up for hosting. The email should have a link to the cPanel address as well as your login credentials. -
Run Softaculous Installer
Once you have logged into cPanel, scroll down to the Softaculous Apps Installer section and click on WordPress or click on the Softaculous Apps Installer icon and then click on Install WordPress. -
Install WordPress
You will see an overview of WordPress. Click on either of the install buttons to continue the WordPress install process. -
Configure WordPress
On the next page you will be able to configure how WordPress is installed. There are a number of important settings that will determine how WordPress is setup.Don’t worry if you need to change these settings. They can be changed after you have setup WordPress.
Software Setup
Choose Protocol: If your hosting comes with a free SSL or you have purchased an SSL security certificate then set the protocol to https:// otherwise keep the protocol as http://. You also have the option to include www but in our opinion it is not needed and your website will function just fine without it. Without www means your website address is shorter to type which is always a positive.Choose Domain: Your domain that you purchased with your hosting should be listed there. Make sure it is selected.
In Directory: If you would like to install WordPress in a sub-directory of your main site then set the directory here. e.g. if you want WordPress to be at http://example.com/blog then you write “blog” and WordPress will be installed at that sub-directory. Leave this field empty if you are installing WordPress at the base level e.g. http://example.com.

Site Settings
Site Name: The name of your site. e.g. WP Absolute.Site Description: A brief description of your site. This is sometimes utilized in WordPress themes but is usually utilized in SEO plugins as a brief description of the site. It can help visitors understand what your site is about.
Enable Multisite (WPMU): If you are wanting to setup a network of sites all managed under the one site then tick this box. In most cases you will just be setting up a single website so you will not need this.

Admin Account
This is the login details you will use to log in and administer the backend of your WordPress website. Make sure if there are default values that you change them. This helps with security on your site because hackers know that the default option for an admin username is likely ‘admin’.Admin Username: The username you will use to log in to your site. Even just setting the username to the name of your site will be better than ‘admin’.
Admin Password: The password you will use to log in to your site. Make sure you set a good password that isn’t easy to guess. A password manager like 1Password will help you with saving and remembering good passwords.
Admin Email: The email address that admin notifications will be sent to. When you create the account, your login details will be emailed to you at this address.

Choose Language
Select Language: If your native language is anything other than English then you can choose your language from this list. WordPress has been translated into more than 35 different languages so chances are your desired language will be available in this list.

Select Plugin(s)
Some hosting providers also suggest WordPress plugins to install with your setup. These are usually plugins that will help speed up or secure your website. If you hover over the (i) icon next to each of the available plugins then they will provide more information to you about that plugin.

Advanced Options
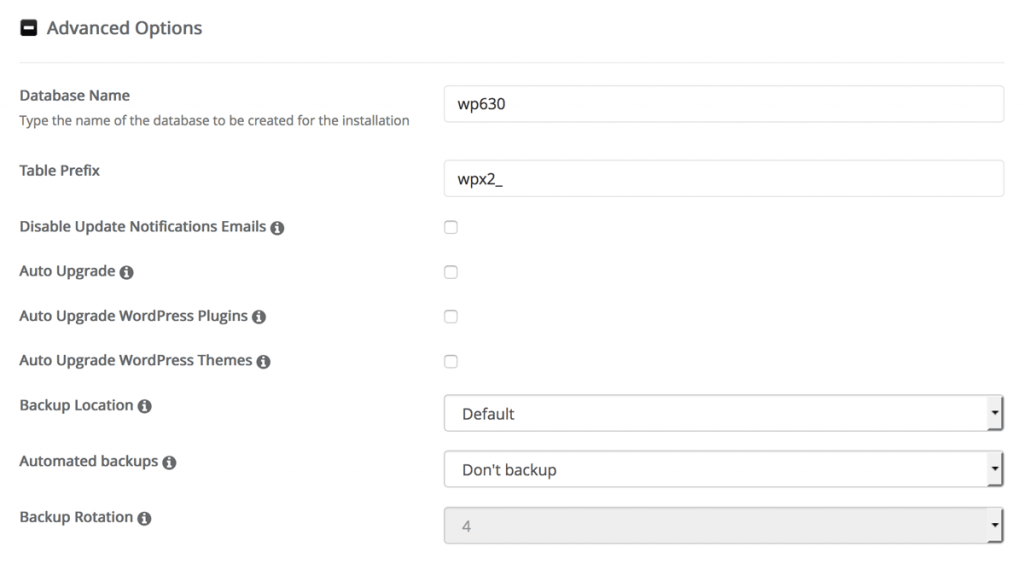
The Advanced Options will differ depending on where your website is hosted.Some of these options may not be available to you or there may be extra options not listed here.
If there are other options not listed here then you can hover over the (i) icon to read more about that option.Database Name: This is the name of the database that your WordPress install will be connecting to. Softaculous will create this database for you.
Table Prefix: The database tables will include this prefix to the beginning of it so that if there are already tables in there or other tables get added then it will be less likely to conflict with these and cause errors.
Disable Update Notifications Emails: If you are the administer of WordPress then it is important to keep themes, plugins and WordPress up to date. Softaculous can send you an email when updates become available. This can get annoying if you are in the backend often and have a lot of plugins installed.
Auto Upgrade: This is a convenient way to automatically upgrade WordPress when a new version gets released. Be sure to backup your WordPress site in case any issues occur from updates.
Auto Upgrade WordPress Plugins: A lot of the popular plugins on WordPress are very well maintained. Plugin authors will release updates and improvements on a regular basis. This option will ensure that all these plugins will get updated when they become available. Make sure you have automatic backups setup so you can restore it if any issues occur from automatic plugin installations.
Auto Upgrade WordPress Themes: The same goes for themes as it does with plugins. New versions of themes get released with bug fixes and improvements so it is important that you are updating your theme. Be careful here as well and make sure you have a backup plugin automatically backing up your WordPress site. If you make any changes to your WordPress theme and it gets updated, your theme will be overwritten by the new version. You can avoid theme overwrites with using a child theme.
Backup Location: This is where your WordPress backups will be stored on your server.
Automated Backups: Your server may be creating backups of your WordPress install. This option allows you to set how often the backups will occur. Be aware if you are on shared or budget hosting, you may not have a lot of space so creating backups will use up the free space.
Backup Rotation: If the number of backups reach this number, the oldest backup will be replaced with the new backup. This will help prevent the server space from completely filling up.

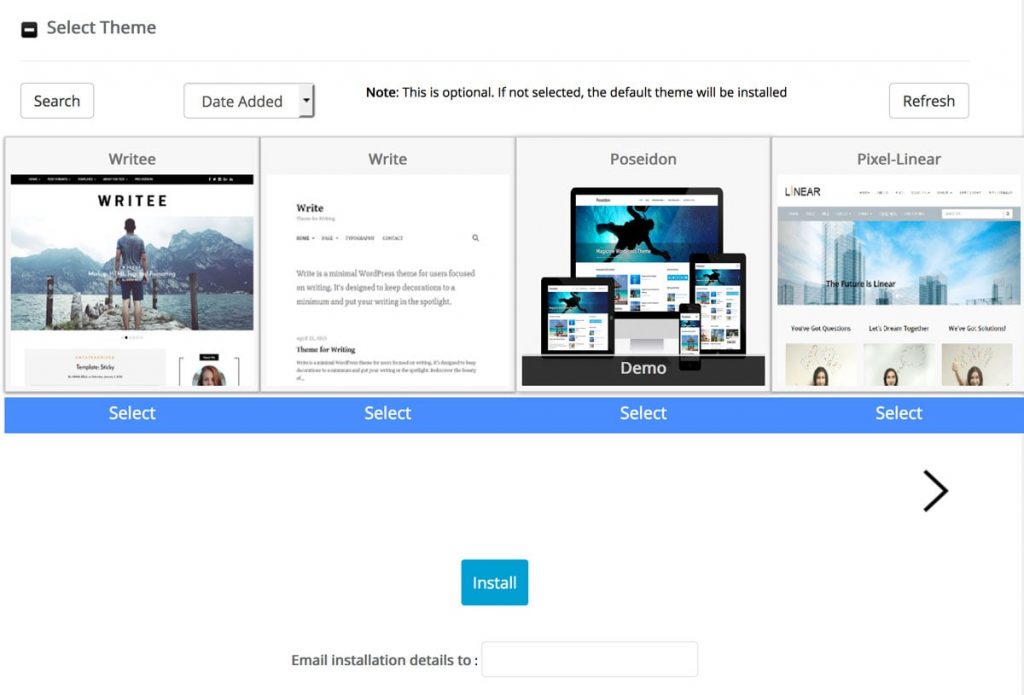
Select Theme
This is where you can choose to select a different theme on your site than the default twenty theme. This section may not appear on some hosting servers. It is optional and you can always choose a better more suited theme after install.Email installation details to: Finally, enter your chosen email address so that the install details can be sent to you.

-
Install
Once you have filled out all of the details and clicked on the “install” button. Softaculous will run through the WordPress setup using the options you have provided.It will take a short moment with a progress bar indicating how long is left until the install completes. Make sure you wait on the page until the install completes.
-
Done
Once the install completes, a success message will display. It will also show you a link to your website and another link to your WordPress admin backend area.The WordPress setup is now complete and you can use your new website.
How to install WordPress manually using FTP
Installing WordPress manually on your hosting server via FTP is slightly more involved than using Softaculous but still very simple.
 We will be using a file transfer application to transfer the WordPress files to your server through a File Transfer Protocol (FTP) connection.
If you do not have a preferred FTP application, you can download Filezilla. It is a free FTP application that works on Windows and Mac computers.
We prefer to use Transmit but it is a paid application for Mac computers so for this tutorial we will be using Filezilla.
We will use WordPress’s famous 5 minute install process once the files and database have been setup.
-
Download WordPress
You need to download the latest version of WordPress to your computer.[button url=”https://wordpress.org/download/” text=”Download WordPress”]
-
 Extract WordPress Zip
Once you have downloaded the zip file, extract the zip on your computer so that there is a wordpress folder with all the WordPress files in it. -
FTP connect to Hosting Server
Install and open Filezilla.
Note: Make sure you follow the install steps closely. One of the install windows will ask to set yahoo as the default search engine and new tab window in your browser. You may not want that. If you don’t, just select “No, thanks”.Locate FTP login details
When you first signed up to your website hosting provider, they should have sent and email detailing the FTP logins.The details you need to connect via FTP are:
- FTP server address. (often it will be ftp.yourdomain.com e.g. ftp.web3.com.au or it will be an IP Address e.g. 123.456.789.098)
- FTP Username. (you or your hosting provider will make this username)
- FTP Password. (you or your hosting provider will make this password)
- FTP Port. (For FTP the default port is 21 but could be different depending on your hosting provider.)
If they are not available in any emails, you will be able to retrieve these details by logging into your hosting server. Each host provider is different so you may need to contact your hosts support if you need assistance finding this.
 In cPanel, you can log in and go to the FTP Accounts section to find available accounts or create a new account. You can also click the Configure FTP Client link to download the logins in a file for Filezilla.
Connect to Server
Once you have either got the FTP details or downloaded the FTP configuration file,
Add these details into your FTP application and click connect. -
Copy WordPress to folder
Depending on what FTP directory access you have with your logins determines where on your server you will connect to. You will want to locate the folder “public_html” This is the public folder that anyone can access when accessing your domain name and is where we upload WordPress to.If you want to create WordPress in a sub folder e.g. https://web3.com.au/blog then you create your desired folder inside the public_html folder.
On the left hand side, navigate to where you unzipped the WordPress zip that you downloaded to your computer in the previous step. Drag all of the files that are inside this folder into the public_html folder (or in the sub-directory if you have chosen to install at a subdirectory).
The upload will take a while depending on your internet connection speed.
Once the files have finished copying to the server, you may close your FTP application. We are finished with it for now.
-
Create the Database
 Log in to your hosting server and go to the MySQL databases section. We are using cPanel but it will be similar for each type of hosting server.
Enter a name for your new database in the field and click on Create database.Take note of the full name of the new database. We will need to use it in a later step.
-
Create Database User
On the MySQL Databases page, scroll down to the users section. You will need to create a MySQL user so that WordPress can use it to access the newly created database.Make sure you take note of the username and password that you create. You will need to use these details in a later step.
-
Add the user to the database
The user that you created still does not have access to the database. You need to assign it on the same cPanel MySQL Databases page.
Make sure the database and database user are selected in their corresponding dropdowns and click the Add button.You will be asked what privileges to allow the user to have. Select all privileges and click on the Make changes button.
Your MySQL database is now setup and ready to use with WordPress in the next step.
-
Setting up WordPress
Go to the address you will be using for your site. This will be your domain e.g. https://web3.com.au and if you installed WordPress in a directory then you need to add that to your address. e.g. https://web3.com.au/blog -
Select Language
The first page in WordPress’s install is to select what language WordPress will use.If your language is English then click Continue otherwise choose your language and then click the Continue button.
-
Welcome to WordPress
This is just a welcome page that gives you a little bit of information on what you need in the next steps. It will tell you that you need your database name and database user logins that we created in previous steps.Just click Let’s go! to proceed to the next step.
-
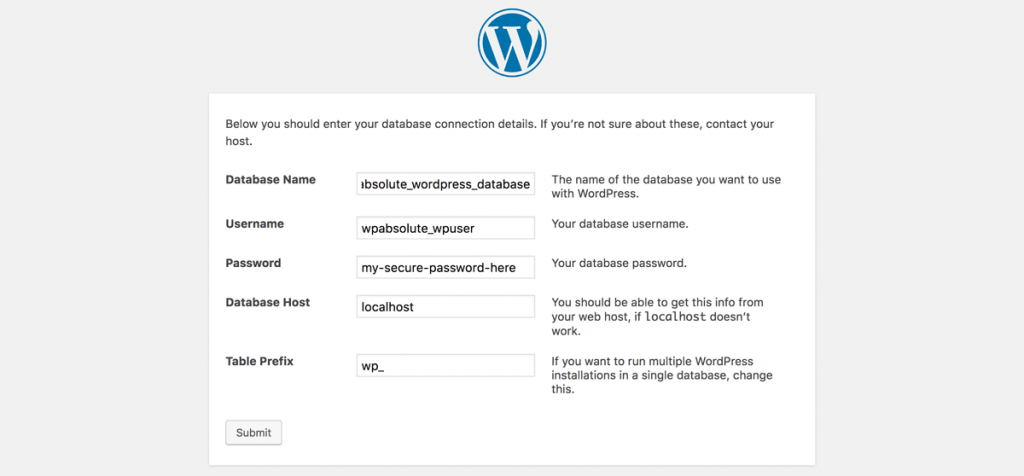
Add Your Database Details
This is the page where you insert your database details that you created in previous steps.Click on the Submit button to allow WordPress to connect to your database.
WordPress will show a confirmation message.You can now click the “Run the install” button to go to the next step.
-
Add Site Information
Now you need to provide information about your website. This information can be changed at a later date in the WordPress settings if you change your mind.Site Title: The name of your site. e.g. WP Absolute.
Username: The username you will use to log in to your site.Password: The password you will use to log in to your site. Make sure you set a good password that isn’t easy to guess. A password manager like 1Password will help you with saving and remembering good passwords.
Your Email: The email address that admin notifications will be sent to. When you create the account, your login details will be emailed to you at this address. You can also log into WordPress using this email address.
Search Engine Visibility: Tick this box if you want to discourage search engines from indexing your site in their search engines. If you are unsure, leave this un-ticked.
Click on the Install WordPress button to finalize the WordPress installation.
-
Success!
WordPress is now installed! You will see a success message with your username. You can now click on the Log in button to sign in to your WordPress site.
How to install WordPress on my computer
If you are just beginning with WordPress, you may be wondering, what do I need to install to run my WordPress website on my computer.
The answer can be one of two answers:
- If you are wanting to publish your website to the world wide web then you do not need to install anything on your computer. You run WordPress from WordPress hosting that you purchase from a website hosting company. All that you need on your computer is access to the internet and a web browser – Likely the one you are using to read this guide.
- If you are a designer or developer who is not wanting to show the website to anyone but yourself then creating a local WordPress install is the way to go. You can setup a WordPress install on your computer using either XAMPP or WAMP for windows computers or MAMP for Mac computers. The software creates a virtual server on your computer where you can use WordPress as if it were online but it is only accessible on your own computer.
What to do after installing WordPress
Now that you have installed WordPress, there are a number of things you can do right away to make your site awesome.
Choose a theme
The visual side of WordPress is controlled by WordPress themes. There are thousands of themes available that suit all types of niches.
We make our own theme called Trisense. We think its great but it is not suited for everybody.
If you’re the type that wants to be able to do absolutely everything from a visual drag and drop interface then you may want to look at ThemeForest or the WordPress theme directory.
Installing Plugins
Plugins are what gives WordPress extra features and abilities that aren’t usually available by default.
Like themes, there are literally thousands of plugins available to suit your needs. WordPress maintains a huge list of plugins in the WordPress Plugins Directory. There are over 52,000 plugins available.
If you cant find what you are looking for in the WordPress directory then you will surely find a paid plugin that you are looking for at CodeCanyon.
Learn to use WordPress
WordPress is the most popular Content Management System (CMS) in the world. Tens of Millions of people use WordPress to power their websites.
WordPress does have a learning curve for people who are new to it.
Our team have been working with WordPress since 2010 and teaching WordPress since 2013. WP Absolute aims to be your number one resource to learning WordPress. View all of our guides on our blog.
Conclusion
We hope this guide helped to shed some light on how to install WordPress on your own. Let us know in the comments if you were able to install WordPress following this tutorial.
Here are some additional guides to help push your site forward:
- Choosing the right WordPress hosting
- How to install a WordPress plugin
- Recommended WordPress Plugins
If you liked this article then please subscribe to get instant updates on the latest WordPress tips and resources. We have a youtube channel and Facebook Page where we will be continually posting new tutorials.


 Extract WordPress Zip
 In cPanel, you can log in and go to the FTP Accounts section to find available accounts or create a new account. You can also click the Configure FTP Client link to download the logins in a file for Filezilla.
 Log in to your hosting server and go to the MySQL databases section. We are using cPanel but it will be similar for each type of hosting server.