If you want to succeed online then you need to have great search engine optimization (or SEO). Arguably the best and most feature rich plugin to help with WordPress SEO is the WordPress SEO by Yoast plugin (or simply Yoast SEO). In this article we will show you how to install and setup Yoast SEO and how to utilize it to increase your own SEO on your WordPress website.
We at Web3 use Yoast SEO to optimise our website and it really makes a huge impact when fully utilised. Are you utilising all of the features of Yoast SEO? In this article we will cover all of the awesome SEO features.

Yoast SEO is packed with a number of extremely useful features for optimising your SEO. It is an extremely comprehensive plugin with a number of built-in tools and features. Here are some of the features that we will be covering in this article:
- Title and Meta Description Set a unique title and meta description for every single post type including posts, pages and taxonomies like categories and tags.
- Google Search Preview Preview what the Google search result will look like when editing the post.
- Keyword optimization target the keywords you’d like your post or page to rank for in the search results.
- Readability checking see how easy your content can be read.
- Meta robots configuration this allows you to noindex and nofollow any type of page or taxonomy to help prevent your pages from being indexed in search engines
- Full canonicalization Support for setting canonicalization of posts so you do not confuse Google with duplicate content.
- robots.txt and .htaccess Editing the technical aspects of SEO with robots.txt and .htaccess file editing.
- Breadcrumbs support automatic breadcrumbs with the ability to configure the breadcrumbs titles.
- XML sitemaps Automatic creation of XML Sitemaps with the ability to include all post types, taxonomies and media.
- Webmaster verification Ability to verify your site with a number of webmaster suites including Google Webmaster Tools, Yahoo Site Explorer, and Bing Webmaster Tools.
There is also a premium version of the plugin that you can purchase. The premium version has all of the features of the free version plus a number of additional features including:
- Internal linking suggestions get prompted to link to other pages on your site. This helps with internal linking.
- Content insights show you the most used words on your page, to check if they’re a match with your chosen keywords.
- Redirect manager easily redirects old URLs to new ones. This helps to prevent 404 page not found errors on your site.
- Premium Support get the most out of your site’s SEO by asking the team who make the plugin. There is also on-page video tutorials as a first point of call to get started.
Now that you know the features of Yoast SEO, lets get started and SEO our WordPress website with Yoast SEO.
How to install Yoast SEO plugin
Yoast SEO is a plugin for WordPress so you need to install it on your WordPress website. Yoast SEO is on the WordPress plugin repository. You can install the plugin from the WordPress plugins menu. For a greater look into how to install a WordPress plugin, see our How to install a WordPress plugin guide.
-
Go to plugins menu
You need to be logged into your WordPress website and an admin to access the plugins menu. Click on the Plugins > Add New menu item. -
Search and install plugin
Search for the Yoast SEO plugin and click the install and activate buttons. -
Go to plugin Dashboard
Once the plugin is installed and activated, you will see a new SEO item in the WordPress admin bar. Hover over the item to access the Yoast Dashboard. The dashboard is the central place to configuring Yoast. You should configure Yoast as soon as you can so the SEO powers can start working.
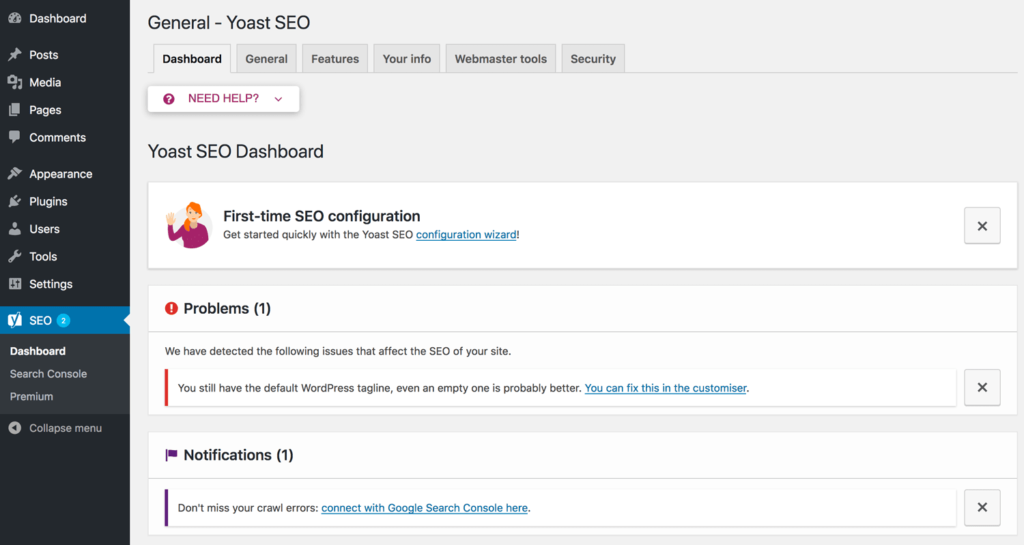
At the top of the dashboard are different tabs which you should configure to suit your preferences.
below you will see a first time configuration wizard to get started quickly. Underneath will show any SEO issues that may be apparent on your site and a notification section to notify you of SEO related things you should be aware of.
How to Setup Yoast WordPress SEO Plugin
To begin with, we will run the first time configuration wizard. On the Yoast SEO dashboard, click on the configuration wizard link to begin setting up Yoast SEO. There are 12 steps to complete, we will go through each step.

Its important to note that SEO is often an opinionated subject. We recommend the options that we know works for us as well as most people. In some cases your situation may not be what we recommend so follow along but treat it as a guide with your own discretion.
-
Begin WordPress SEO configuration
Choose how you would like to configure Yoast SEO. You can either do it yourself or hire one of the Yoast SEO staff to do it for you. Because you are following this guide, we will help you with the right steps. So we will be selecting the Configure Yoast SEO button. -
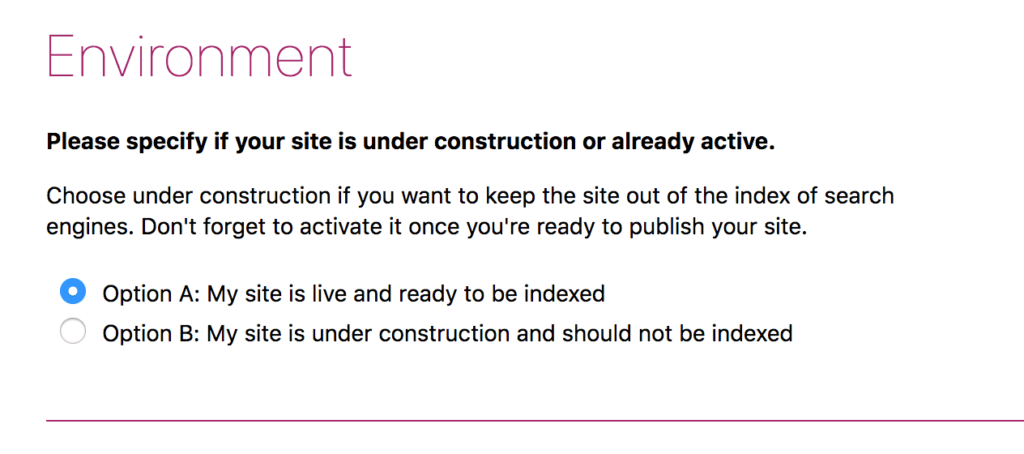
Set Environment
If you are still developing your website and do not want it indexed in search engines then you can choose Option B – to not have your website indexed. Otherwise you can choose Option A – My site is live and ready to be indexed if you want your website to be included in search engine results.
If you are just starting out, you will want to have as much visibility as you can as quickly as you can so it is recommended that you do index your site. Even if you’re still developing your website, you can have your pages getting indexed in search engines.
From personal experience it is much better to release your site and continually iterate and improve rather than perfect and release only after a very long time of development. In most cases your website will not receive any traffic at the start so indexing will help you get traffic quicker.
Once you have chosen your option, click next.
-
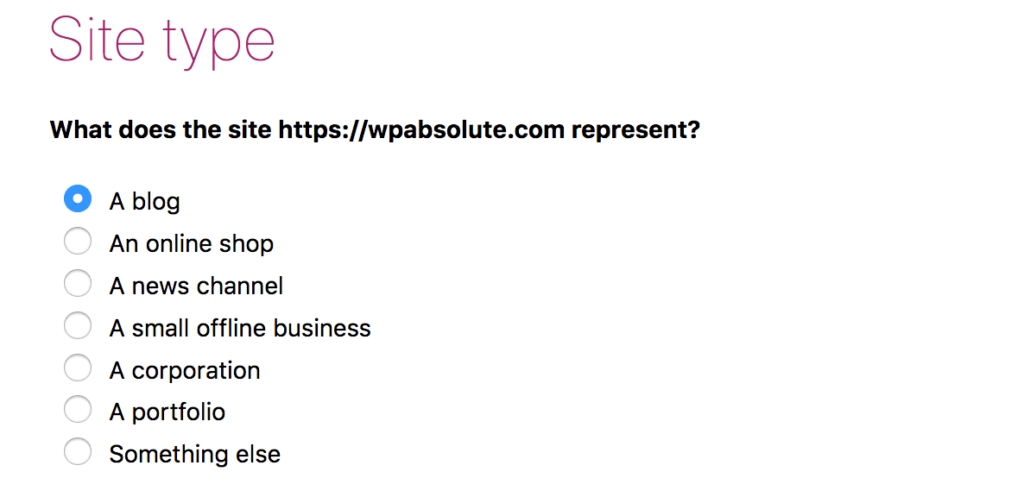
Choose your site type
You need to choose what type of site your website is. The options are a blog, online shop, news, offline business, portfolio or other. All websites should fit into one of these categories. By selecting a category, it will help shape the way the SEO is applied to your site because optimizing for a shop is different to optimizing for a blog.Once you have selected your option, click next.
-
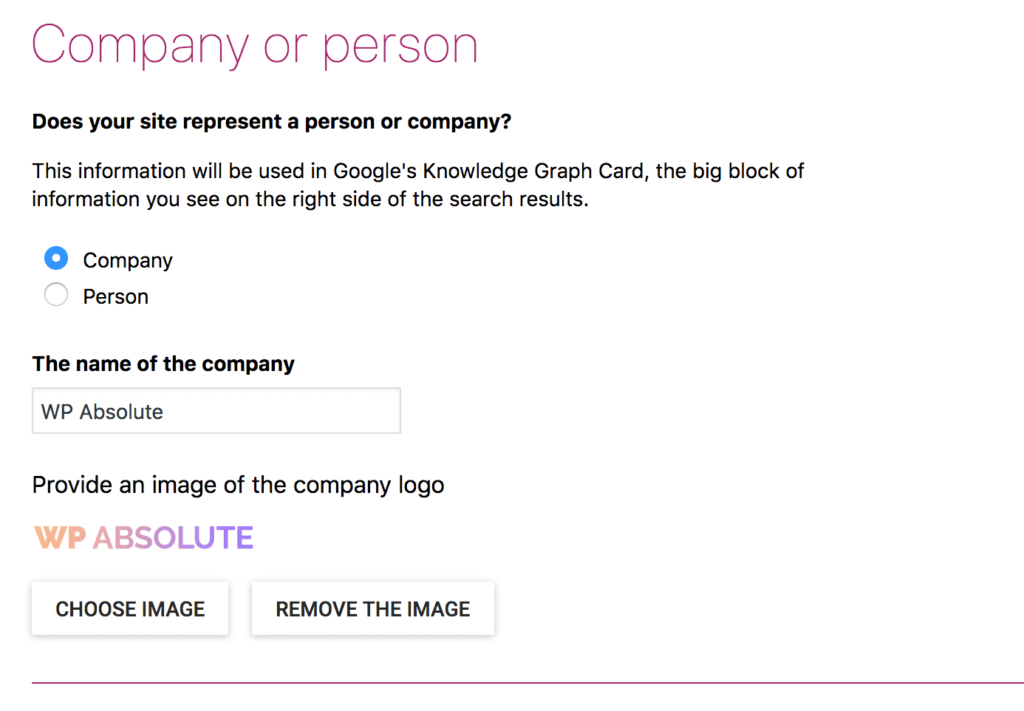
Does your site represent a company or person
Your website will either be based on a company or a person.Whichever type of brand your website represents, you should select either a company or person to optimize for that type.
If you choose company, you will be prompted for the company name and a place to upload the company logo. Whereas if you are a person, you will be prompted for just the persons name.
Once you have chose your option, click Next.
-
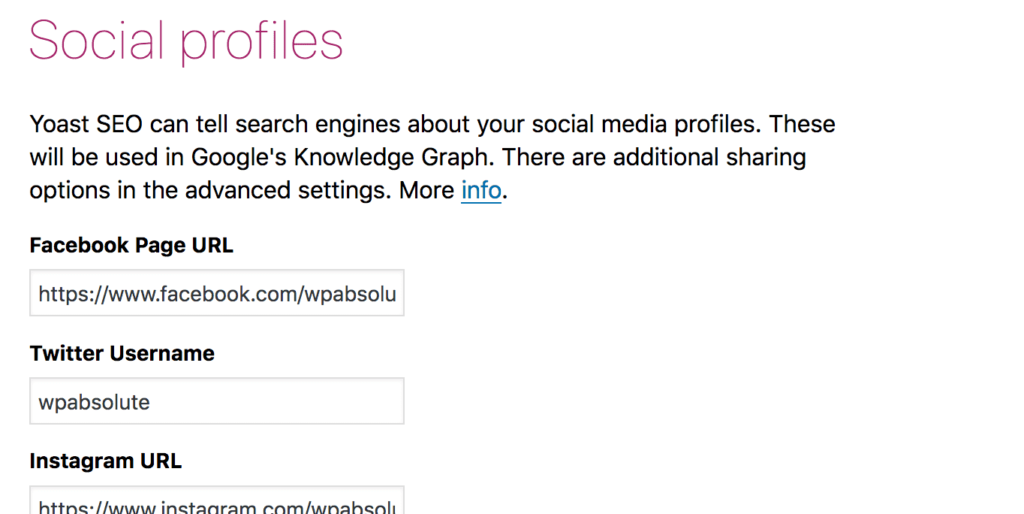
Add your Social profiles
The 5th step is to add either your person or companies social media profiles. There are options to add the 8 most common social media accounts. You can add Facebook, Twitter, Instagram, LinkedIn, MySpace, Pinterest, YouTube and Google+.Adding your social profiles helps to associate your website to your brand and other prominent areas on the web. If you add your profiles then they may get displayed in Googles Knowledge Graph.
Once you have added all of your social profiles, click the Next button.
-
Set your Post type visibility
In this step you choose which post types should be included in your sitemap and you indicate what should be allowed to be indexed in search engines. If you are unsure then you can leave them as is but be aware that if you have a custom post type then you will have to activate them if you want them to display in search results.Once you have set the post types to be either hidden or visible, click the Next button to proceed to the next step.
-
Set multiple authors
If your website has more than one author on the site then you can choose to have an author archives page. This means that pages are automatically created to display posts by a chosen author.You wouldn’t need this and it would be considered duplicate content to your blog main page if there was only one author to your site.
Once you have either chosen yes or no to create author pages, click the next button to proceed to the next step.
-
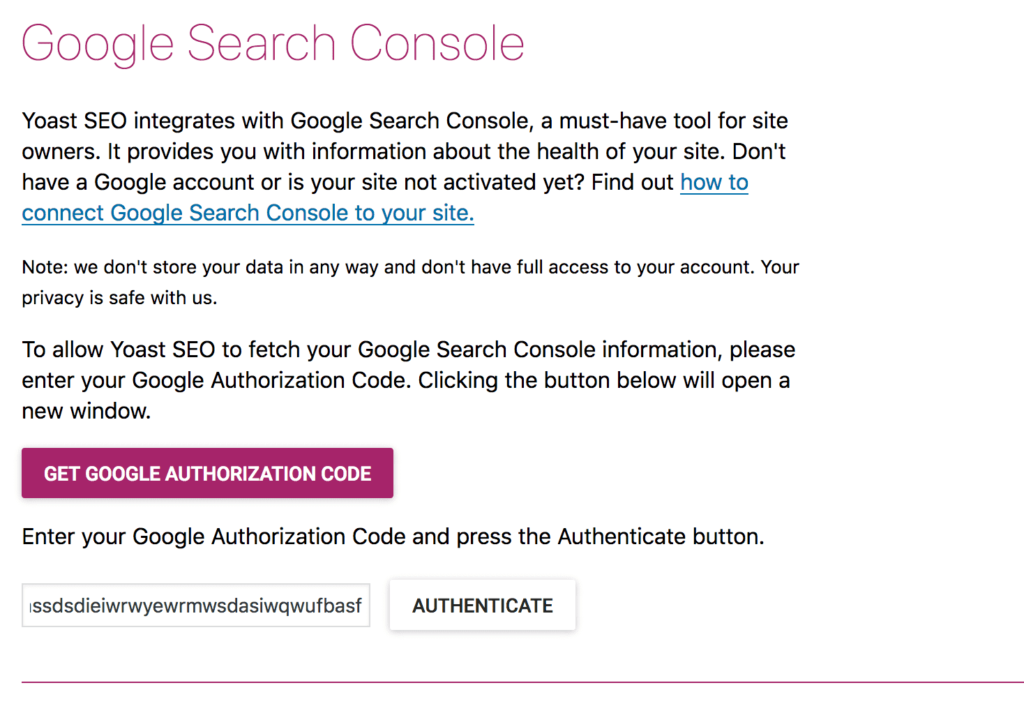
Authorize Google search console
Google search condole is a must have tool that helps to provide health information about your site. If you have not yet authorized Google search Console with your site yet then this step is a quick way to provide authentication.Simply click the Get Google Authorization Code and then copy and paste it into the field below.
Once you have authenticated your Google search console account with Yoast SEO, click the next button to proceed to the next step.
-
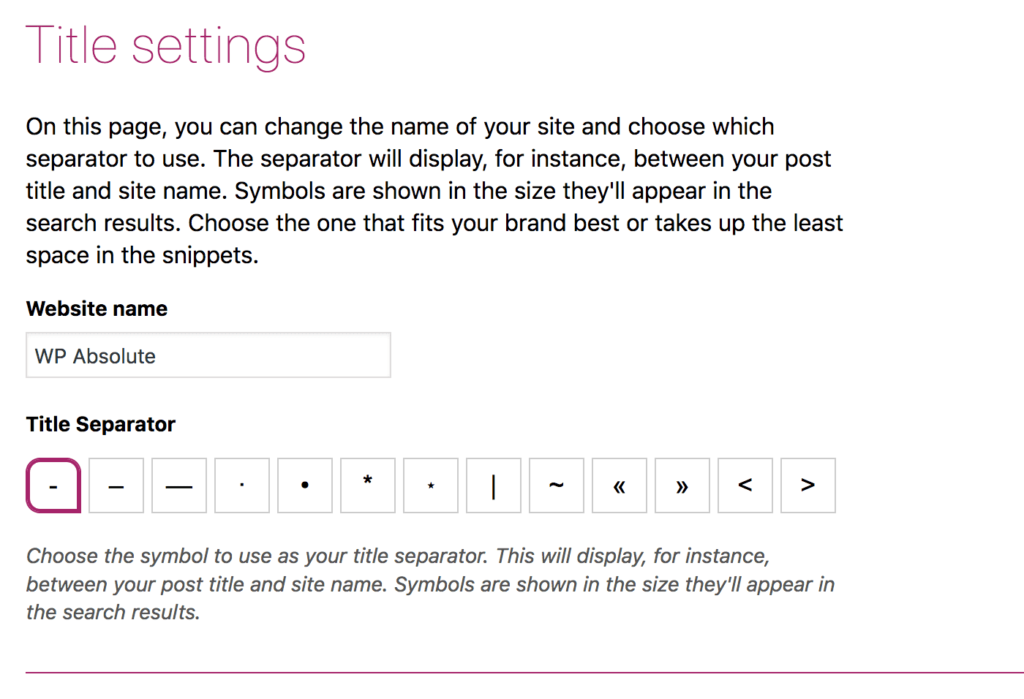
Set the page title settings
On this page, you can change the name of your site and choose which separator to use. The separator is displayed between your post title and site name on every page in your browser.Update your site name and title separator if required and then click the next button.
-
Optional Newsletter signup
If you would like to keep up to date with Yoast then enter your name and email address into the fields and then click sign up.If you dont want to sign up to an email newsletter then click the next button.
-
Optional Upgrades
This page lists the optional upgrades and services that you can purchase from Yoast. If you wish to purchase then click their links otherwise continue to the final step. -
Success
This page simply states that your Yoast configuration has now completed and you can click on the close button to finish.


There is a good snippet of text on the final page that states:
To really improve your site’s performance in the search results, it’s important to start creating content that ranks well for keywords you care about.
This is extremely important to making your website rank online. Now that you have setup the basics of the Yoast SEO plugin, we will dive into setting up the remaining settings in Yoast SEO. Once the other options are set, then you can finally begin creating your own great content and improve your websites SEO.
Advanced Settings Yoast SEO
On the Yoast Dashboard, select the Features tab and scroll down to the Advanced settings pages section and select Enable. Then save the changes to enable the advanced section of this plugin.
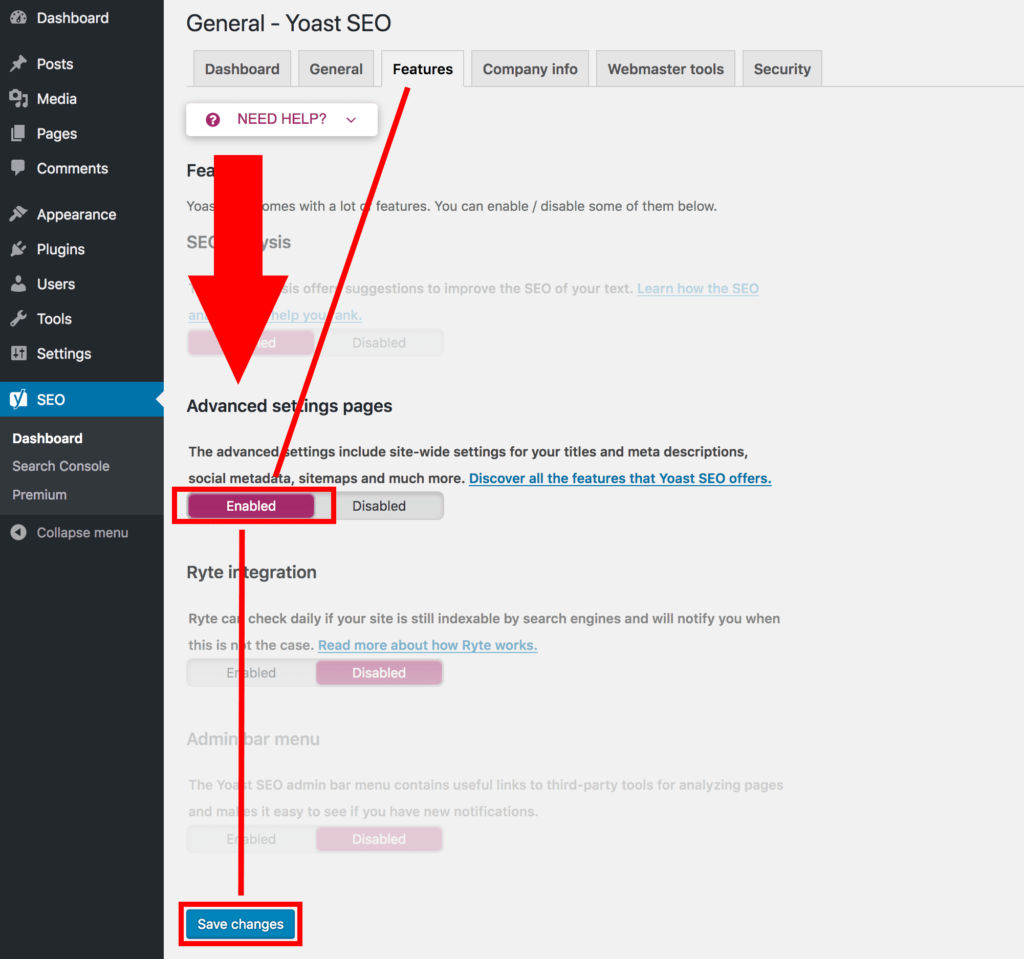
New menu items will appear under the Yoast SEO admin bar menu.
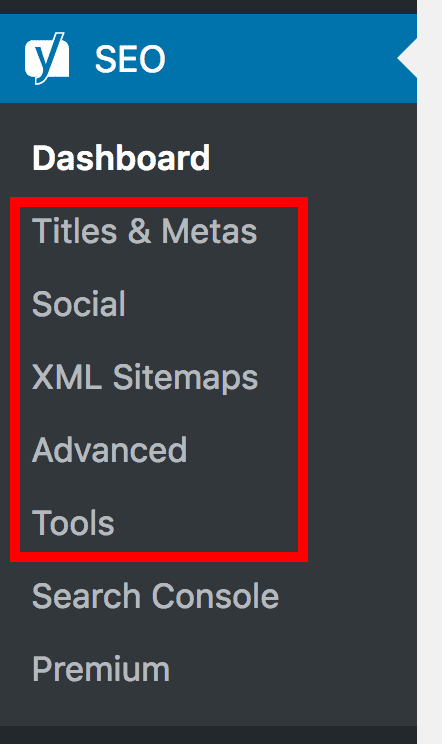
The options that you just enabled are: Titles & Metas, Social, XML Sitemaps, Advanced and Tools. We will go through each option and set them up correctly below.
Go to the Your info/Company info tab and fill out each of the fields that you can if they are not yet filled out.
You website name is what will be displayed in Search Engines. Sometimes your website might be known as something else. Add this name in the Alternate name field if you have one.
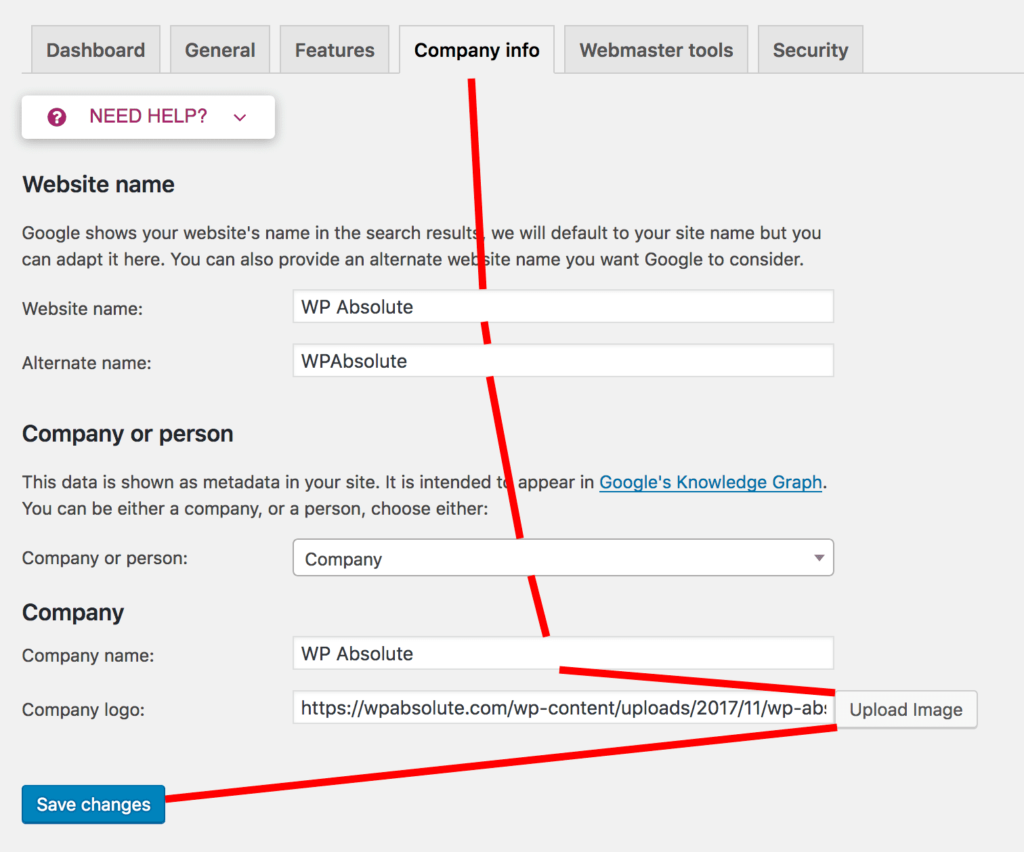
Click the Save Changes button to save your entered info.
If you are using either Bing, Google or Yandex Webmaster tools, go to the Webmaster tools tab and verify these profiles on this page.
On the Security tab there is only one option. This is to enable the advanced part of the Yoast SEO meta box for every user. This means that it will allow any user to make potentially negative SEO related changes to your posts.
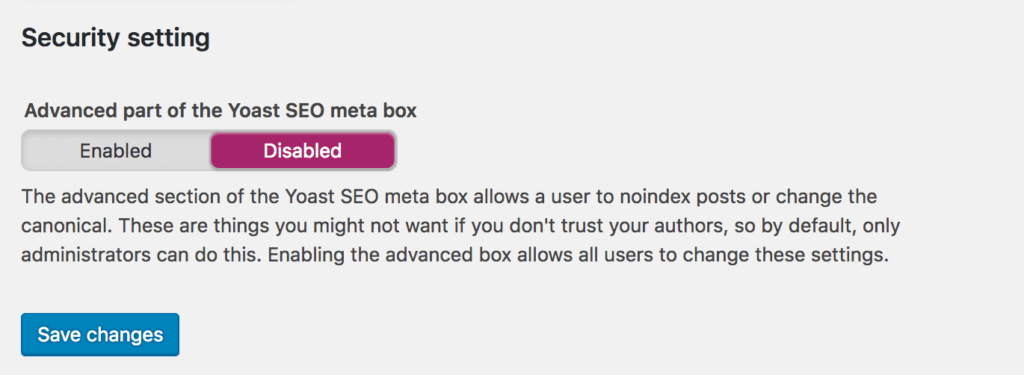
It is generally recommended you keep this disabled so that they can only make positive SEO changes.
Titles and Metas
The next section to configure is the options on the Titles and Metas page. Go to the Titles and Metas menu item in the Yoast SEO admin sidebar.
This page has the following tabs: General, Homepage, Post Types, Taxonomies and Archives. We will cover each tab below.
These title and meta description templates will be used if you do not add a unique title and meta description on each individual post.
We leave the description fields blank for all post types and recommend leaving the default title template for each post types and taxonomies.
Yoast SEO adds an SEO meta box underneath each post editor area. So for maximum SEO results, it is highly recommended that you manually enter the title and description for each post, page, and custom post type on your site.
General Tab:
This page allows you to set the Title Separator for each page. The Title Separator is the little symbol that sits between your post title and site name in the page title.
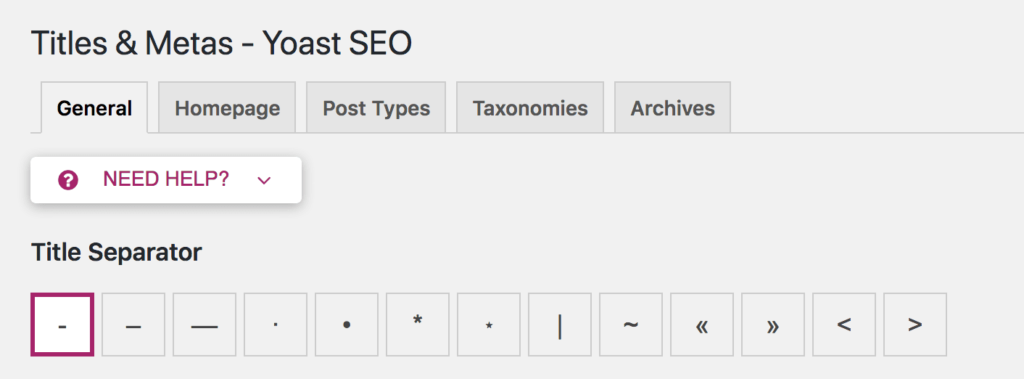
If you are unsure or happy to leave it as is, choose the dash. Web3 uses the dash or pipe in our title separator.
In the next tabs you can choose whether you want to use the separator or create your own custom titles.
Homepage Tab:
This tab allows you to either explicitly set or dynamically set your homepages title using the title template.
The title template is a way to set the pages title whilst keeping it dynamic so you do not need to explicitly set a title for every page. This is particularly handy for when you have thousands of pages where setting a title would be far to time consuming. The Title template will fill in the title based on the content for that post/page.
The homepage is likely not something that you will need the title to dynamically update so you can either write the title as it would appear in search results or utilize the title template so that it automatically generates one for you.
The default title template is
[code type=”markup”]%%sitename%% %%page%% %%sep%% %%sitedesc%%[/code]
There are 4 parts to this that will dynamically update for the content. You can add or remove each part to your liking.
- %%sitename%% – Converts to the name you set in the Your info/Company info tab on the dashboard
- %%page%% – If there is a paginated homepage then the current page number will be added to the title like “page 2 of 2” otherwise it wont.
- %%sep%% – Converts to the separator that you set in the General tab in the previous section.
- %%sitedesc%% – Converts to the tagline that is set in your main WordPress Settings > General page.
Note that there are more template options available in the need help dropdown in the Template explanation tab. You can copy and paste these templates to create your title template.
So if we translate that for the Web3 homepage, it will turn into something like this:
[code type=”markup”]Web3 – Brisbane Web design & development[/code]
You can of course just explicitly write Web3 – Brisbane Web design & development rather than having it generated by the title template markup.
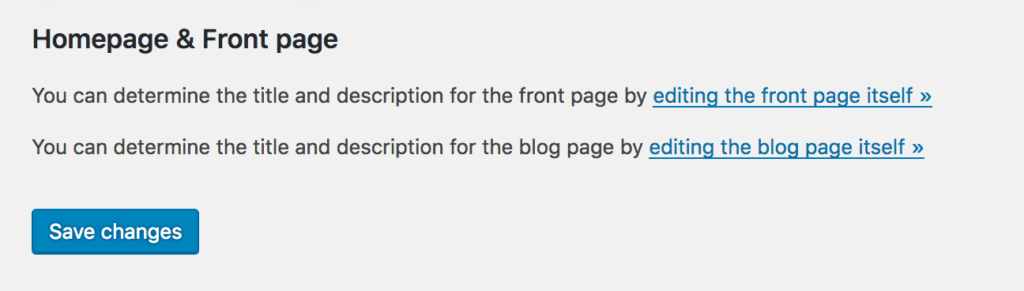
Note: If you are using a static homepage set in the WordPress Settings > Reading page, then you will see links to edit your homepage and blog page to add the title and meta descriptions there.
Post Types:
WordPress comes with several post types such as post, page and attachments. Themes and plugins may also define their own custom post types. This section lists all of your post types that are in your website.
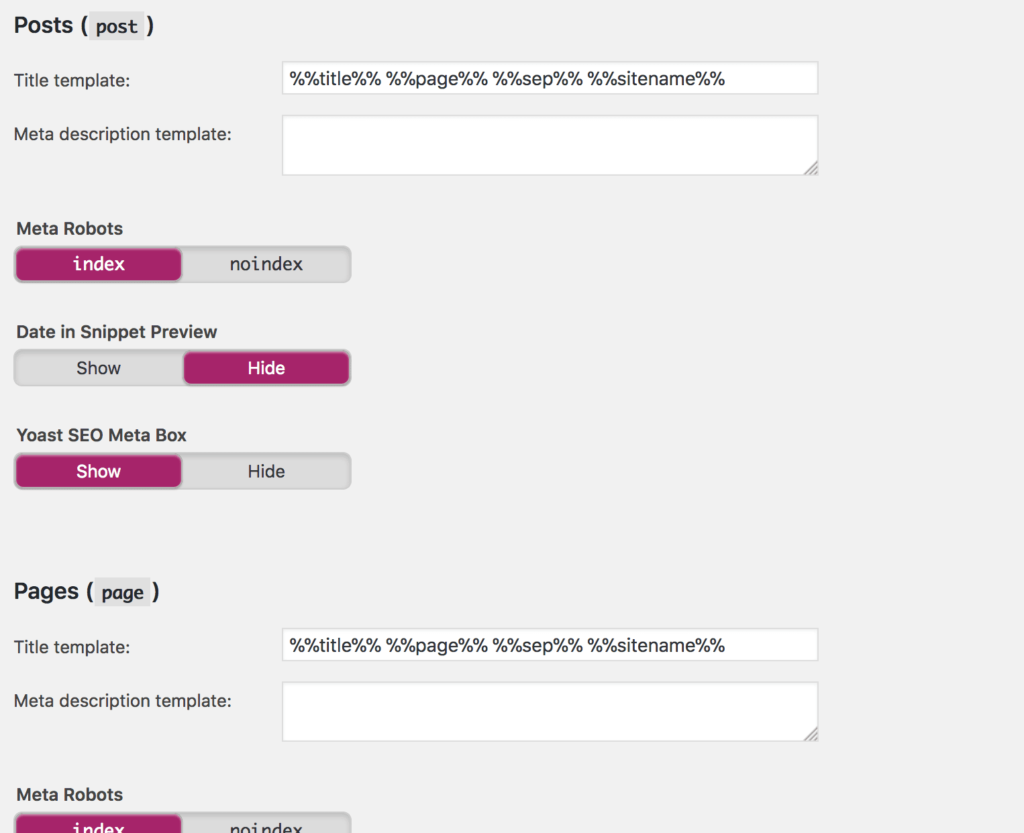
It allows you to set your own title and meta description template and a couple of settings per post type. For these pages, utilizing the title template is a must because you will be creating multiple pages/posts. You do not want to set the same title for all of them otherwise you will end up with duplicate title and description tags.
You can also choose whether you want that post type to be included in the XML sitemap or not by either selecting index or noindex. This is important when you have post types that are not meant to be included in your search results. e.g. plugins that utilize post types like some sliders. You may choose not to index the post that is created and only use that slider of that post type on other pages.
The robots meta tag is markup that gets put in your website headers code and instructs search engines whether they should index the website in search engines or not. Selecting noindex will instruct the search engines to not index that post types pages. Selecting index will instruct search engines to index your post type pages.
The next option lets you set whether you want the date to be displayed in search engine results or not. This may be necessary for time-sensitive posts.
Finally you can choose to show or hide the Yoast SEO meta box for when you are editing that post types posts.
Go through each of the post types and choose your options. Once you have completed your option, select the Save changes button.
Taxonomies:
The taxonomies tap is similar to the Post types tab except that the title template is slightly different and it does not have the date in snippet preview.
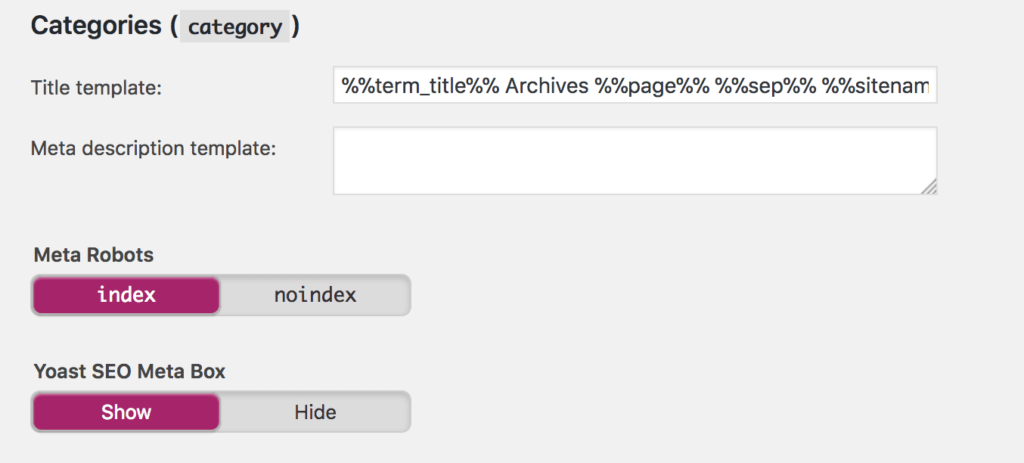
You may want to change the title template because it adds in an “Archives” word. This isn’t a template and is simply a word that you can change or remove to your liking.
Go through each of the taxonomies and choose your options. Once you have completed your options, select the Save changes button.
Archives:
The archives tab has a number of options similar to the Post Type/Taxonomies pages.
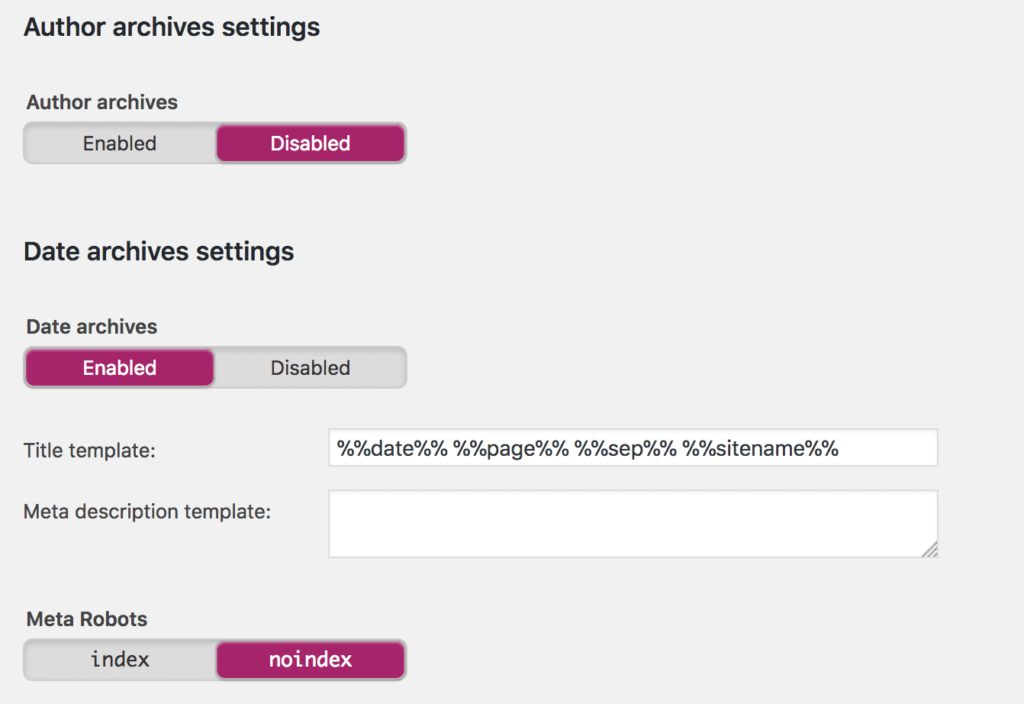
This tab includes the option to create an Author archives page. An author archives page lets you filter posts by a single author. If you only have one author then you should disable this as it will make a page that is exactly the same as your blogs index page. If you have multiple authors, it is a nice way to allow users to view all posts by that author. This setting is here to prevent duplicate content.
If you are using the date archive pages then you can set the title and meta description template for it. If you are not utilizing date archives then you can disable it.
Finally there are title templates for search results pages and 404 page not found titles. By default, both of these types of pages will be noindexed in search results so you only need to set the title.
Once you have configured the options on this page, click on the Save changes button to save your changes.
Social
An important factor to SEO is social signals. Yoast SEO makes integrating your site with social platforms such as Facebook, Twitter, Pinterest and Google+ a breeze.
Clicking on the Social sub-menu item in the Yoast SEO sidebar menu brings up the Social settings. There are options for Facebook, Twitter, Pinterest and Google+. We will cover each option below.
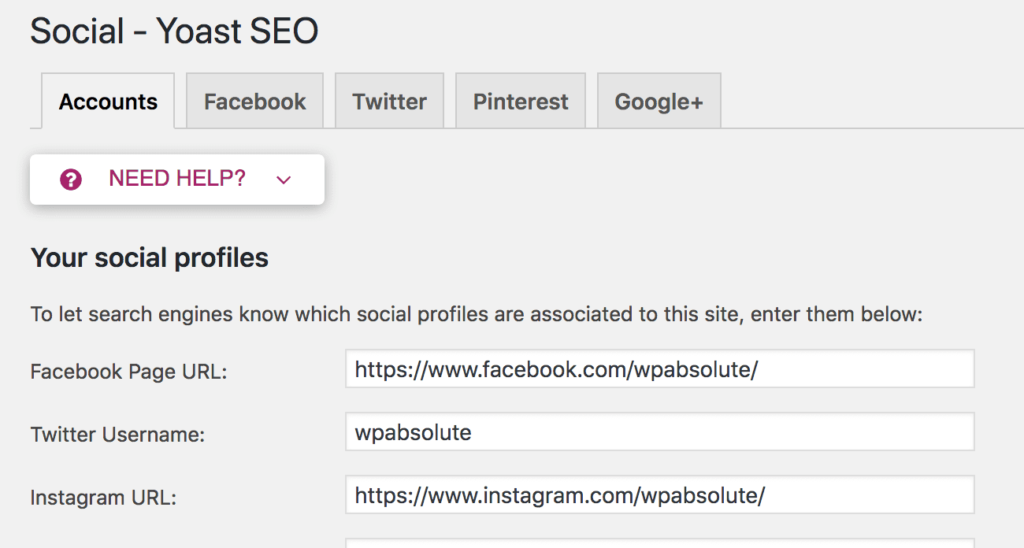
On the Accounts tab page, you will be able to list all of your social profiles. This lets search engines know what social profiles are associated with your website.
Add in the url of each of your social profiles and click the Save changes button to save your profiles.
Facebook:
The Facebook tab has a number of options to optimize your content for Facebook sharing.
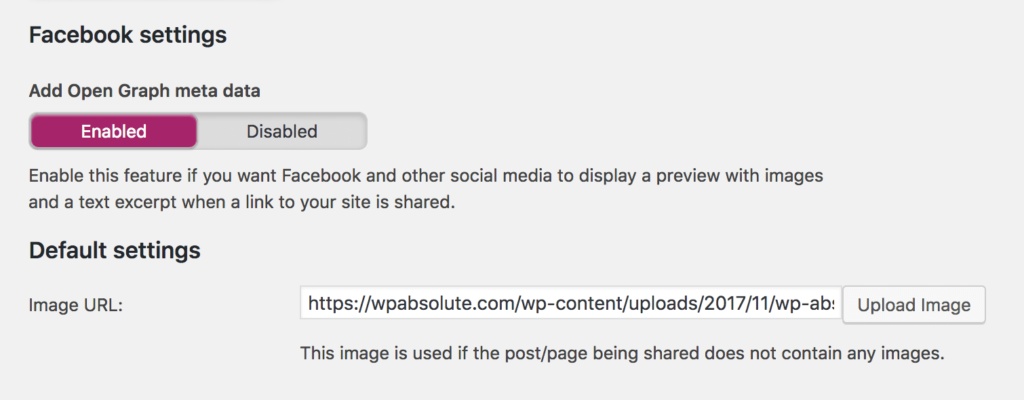
Add Open Graph meta data: Choose enable on the Open Graph meta data if you want Facebook and other social media sites to display a preview of the content with images and a text excerpt when a link to your site is shared.
Front Page settings: This is the information used when someone shares your homepage of your site. You can set the image, title and description or click the button to copy the information that is already set on the homepage if any.
Default settings: This is what will be displayed when someone shares a page that does not have an image set. You choose the image that gets displayed instead of it displaying no image.
Facebook Insights: If you want to utilise Facebook insights then you need to register your Facebook App ID with your website to show Facebook that you are related. You can do this by putting in your Facebook App ID into the field.
Once you are done, click the save changes button.
Twitter:
The Twitter tab has options that enable you to optimize content for Twitter.
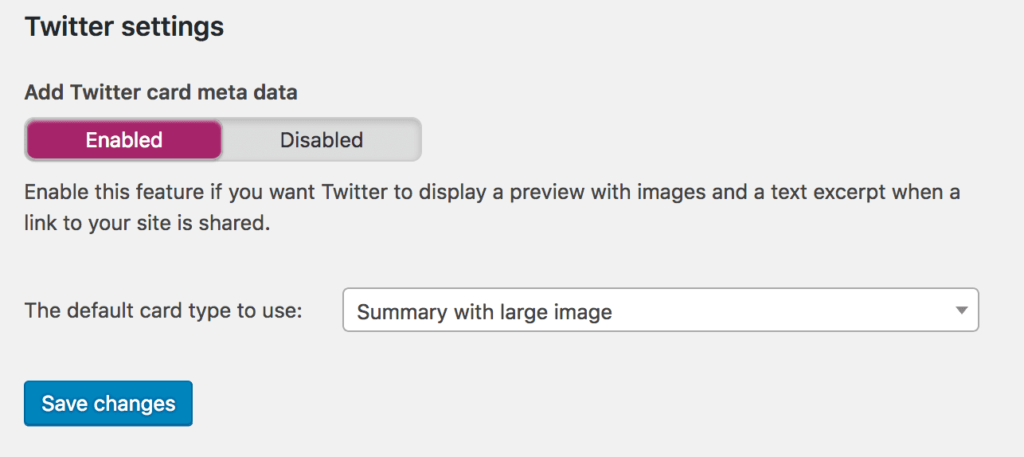
Add Twitter card meta data: Choose enable on the Twitter card meta data if you want Twitter to display a preview with images and a text excerpt when a link to your site is shared. It is recommended to enable this option.
The default card type to use: You can also choose what type of card layout you want to use. You can either have the card display and excerpt with or without an image. Keeping the Summary with large image option selected is the recommended option.
Once you have set your options be sure to save changes.
Pinterest:
The Pinterest tab has only one option. Because Pinterest uses the same Open Graph data as Facebook, there are no optimisation fields required for pinterest as long as you have Open Graph enabled on the Facebook tab.

Pinterest confirmation: This field is a simple way to verify ownership of your site with Pinterest. Log into your Pinterest account and go to your account settings to retrieve the confirmation meta tag. Enter the tag in this field to verify your ownership.
Save changes when done.
If you have already confirmed your site with Pinterest then you can skip this step.
Google+:
There is only one thing to do on the Google+ tab. That is to link your Google+ page with your business.
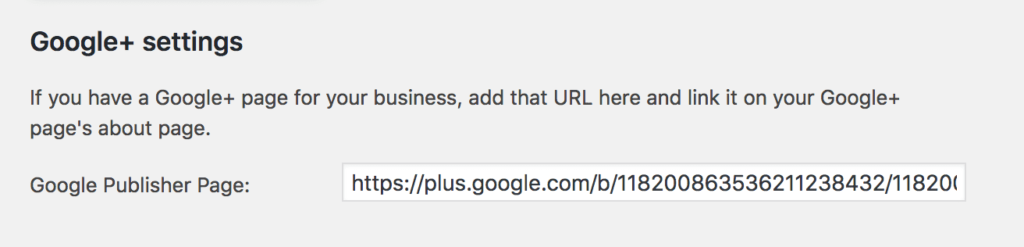
Google Publisher Page: If you have a Google+ page for your business, add that URL into this field. You should then go to your Google+ page to add your websites link onto your Google+ page’s about page. This is to tell google who is involved with writing on your website.
XML Sitemaps
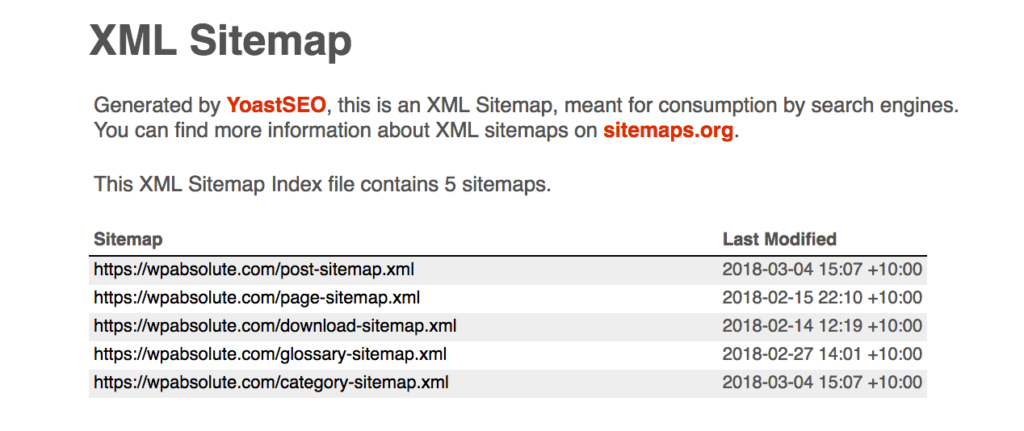
XML sitemaps are one of the most important aspects of behind the scenes SEO to ensure that search engines are made aware of your content. An XML sitemap is essentially just a list of all your websites links that you want to be indexed in search engines.
You submit the XML sitemap in each of the search engines webmaster tools/search consoles and they will begin to crawl and index the pages on your site.
When you are just starting out, XML sitemaps are an effective way to get search engines to recognize and index your content as soon as possible. It is also a way to tell search engines how they should prioritize your content.
If you do not submit an XML sitemap then search engines may still find and index your site but it could be many days or weeks before this were to happen.
Yoast SEO does all the hard work for you in creating and maintaining your XML sitemap so all you need to do is to configure it in each of the tabs. Go to the XML Sitemaps sub-menu in the Yoast SEO sidebar menu. We will cover each tab below.
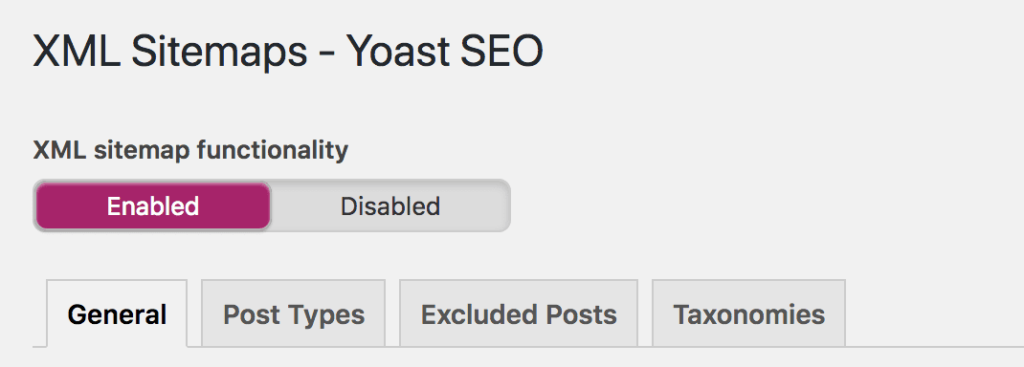
First you want to make sure XML sitemaps is enabled.
General:
The general tab shows you a link to view your XML sitemap.
It also shows an option to configure its size for performance on your hosting.
Max entries per sitemap: If you notice issues with your sitemap not loading then it may be because of your servers performance. If you are on a budget server that is low on memory, then you can adjust the number of entries per sitemap page so that your server can handle it. This wont affect which pages get indexed or not it is purely for server performance. If your sitemap is viewing fine then you can leave it on its default 1000 entries.
If you made changes then be sure to click the save changes button.
Post Types:
The Post Types tab lets you choose which post types you want to include in the XML Sitemap. By default there is the Post, Pages and Media post types but there may also be other post types displayed here if they are added through your theme or plugin.
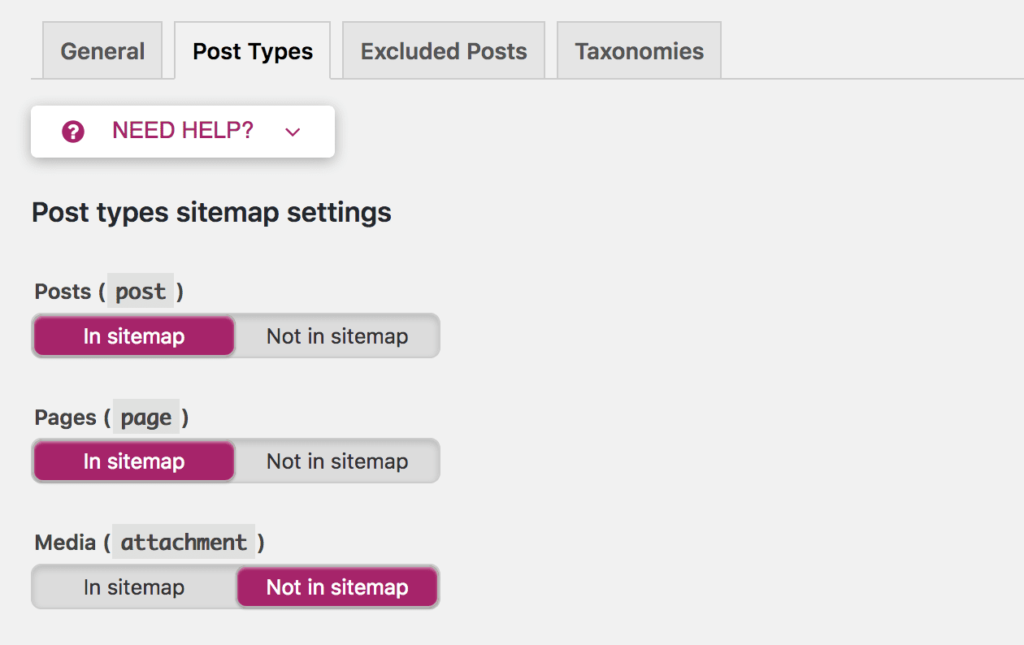
Make sure the post types that you want to index are set to In Sitemap and the ones you do not want are set to Not in sitemap.
It depends on the context of your site and is also a matter of preference but we disable the media post type from being in sitemaps. We do this because our site is based around content as a whole – not around single images. If your site was based around images then you may want to enable this.
Save your changes by clicking on the button below and move onto the next tab.
Exclude Posts:
The exclude posts tab lets you exclude posts from the sitemap. You can choose to exclude single posts, pages or custom post type posts from being added in the sitemap by entering their ID with it comma separated into the field.
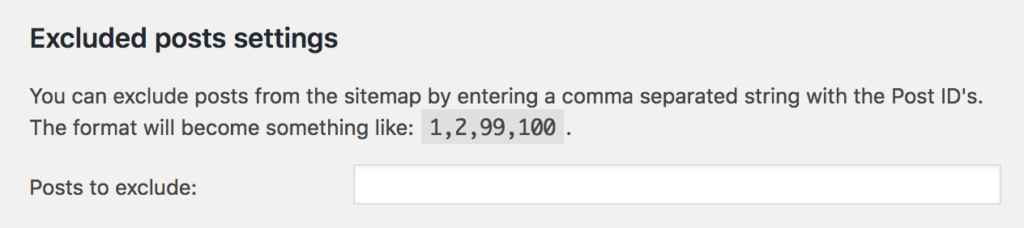
Save your changes when you’re done.
Taxonomies:
The taxonomies tab lets you choose to include and exclude taxonomies from the sitemap. It is similar to the Post Types tab but for taxonomies not posts.
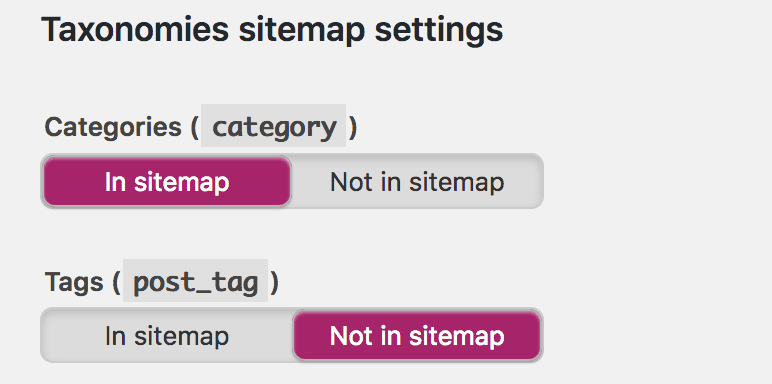
Taxonomies are fine in sitemaps if they are utilised and optimised for SEO. If they are not optimised and not any different from your blog index then you may want to consider excluding them from the sitemap as they might be considered thin content.
When you’re done, save your changes.
Advanced
The advanced settings page found in the Yoast SEO sidebar menu is where you go to configure breadcrumbs, permalinks and RSS settings.
Breadcrumbs:
Breadcrumbs are great for usability as well as internal linking of your site. They show a navigable structure or path to the hierarchy of your sites content. Search engines will often display your pages breadcrumbs in search results too giving you an advantage in search results.

Enable breadcrumbs by selecting the Enabled button. All of the default settings will likely suit your needs. If you wish you can make any necessary changes then click the save changes button.
If you want to display SEO breadcrumbs on your site then you need to insert some code in your theme files. This is an advanced topic and if you are not capable then you should get your Brisbane web designer to help you with this task. See the Yoast Breadcrumb article for more information.
Permalinks:
The settings in the permalinks tab has some permalink related SEO Options. It is different to the Settings > Permalinks settings as these relate to SEO.
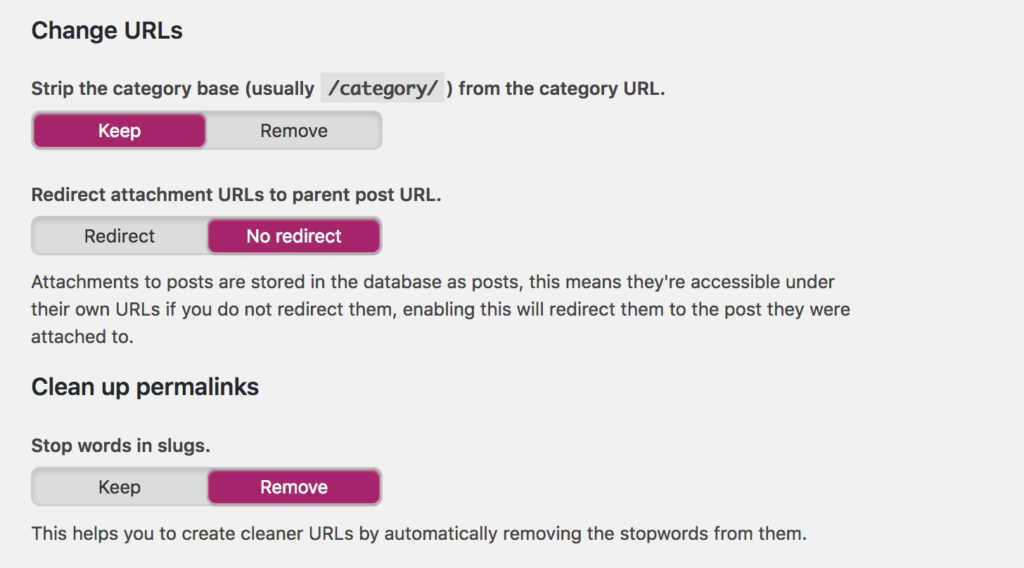
This tab assumes that you have already setup permalinks in your WordPress settings.
Strip the category base: This setting allows you to remove the base part from the category URL (usually /category/). This is nicer to view and simpler but can conflict with URLs of posts that have the same slug as the base is what makes the structure differentiated. This option to keep or remove is a matter of preference.
Redirect attachment URLs to parent post URL: WordPress automatically creates a URL where your images can be viewed by themselves. When someone lands on a media attachment page (the page that displays a single image) you can choose to redirect the user to the page or post where the image is actually being used and embedded on the page instead.
Stop words in slugs: This option helps you to create cleaner URLs by automatically removing the stopwords from them. Stop words are words which do not contain important significance in a Search Query. They are usually ignored. Words such as “a, and, it, the” etc are all stop words that will automatically get removed from the post URL.
Stop words are a matter of opinion and some choose to leave them in. Others choose to remove them from the URLs because they make them cleaner. We remove them because it is quick and does it for us but if you wanted the best option, you would keep the stop words but craft your slugs yourself.
Remove the ?replytocom variables: This is an option that simply improves crawl efficiency for search engines when you have a lot of comments. This function prevents threaded replies from working when the user has JavaScript disabled. Most search engines that crawl your site do not have javascript functionality so it speeds up crawling of your page.
Redirect ugly URLs to clean permalinks: This is not needed in most cases. Ignore it unless you know what you’re doing.
RSS:
This tab has some settings relating to RSS feeds.
RSS Feeds are a way for content scrapers to copy content from your website. This is good for people to consume your content but also not good because some scrapers will steal your content. Yoast SEO helps fix this by adding in a backlink to your website for each posts in the RSS feed.
This means that Google will know you are the original source because your backlink is on their site.
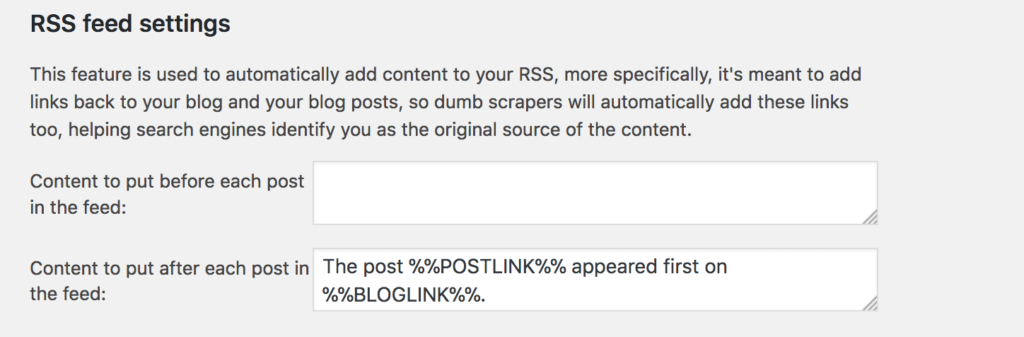
Adding content before or after the post in your RSS feed is also a way to add advertising if you have any.
You can add any content you like or leave it as is. Similar to the title tag templates, there is templates for the RSS feed too to make the content dynamic.
You can add the author link, post link, blog link or blog link with description.
Tools
Yoast SEO comes with some very powerful built-in tools that make your search optimizing easier and more efficient.
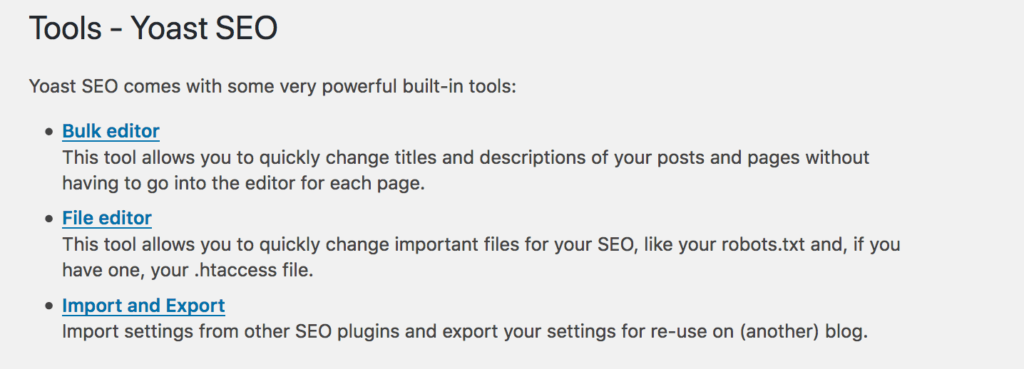
Bulk Editor: The bulk editor is a tool that allows you to quickly change titles and descriptions of your posts and pages without having to go into the editor for each page. It displays a single page with a table of all your posts where you can add a new SEO title. The benefit of this is it allows you to view them all together ensuring that you do not create duplicates and that they are all unique.
You can filter the posts by a certain post type and sort by either title, post type or publication date.
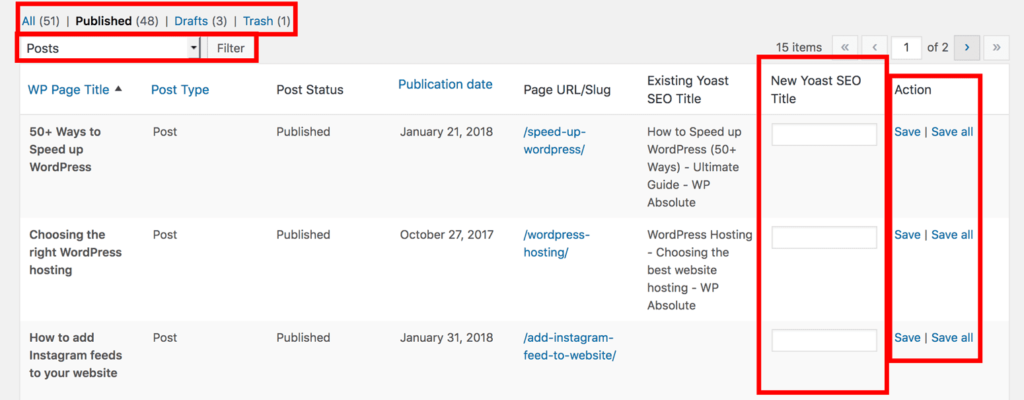
There are two tabs you can switch between. You can either edit the posts title or the posts meta description.
Once you have added all of the titles and descriptions click the save all link to save each one to their posts. Well optimized titles and meta descriptions are extremely helpful for good SEO.
File editor: The file editor tool allows you to quickly change important files for SEO. You can create and edit a robots.txt file and, if you have one, your .htaccess file.
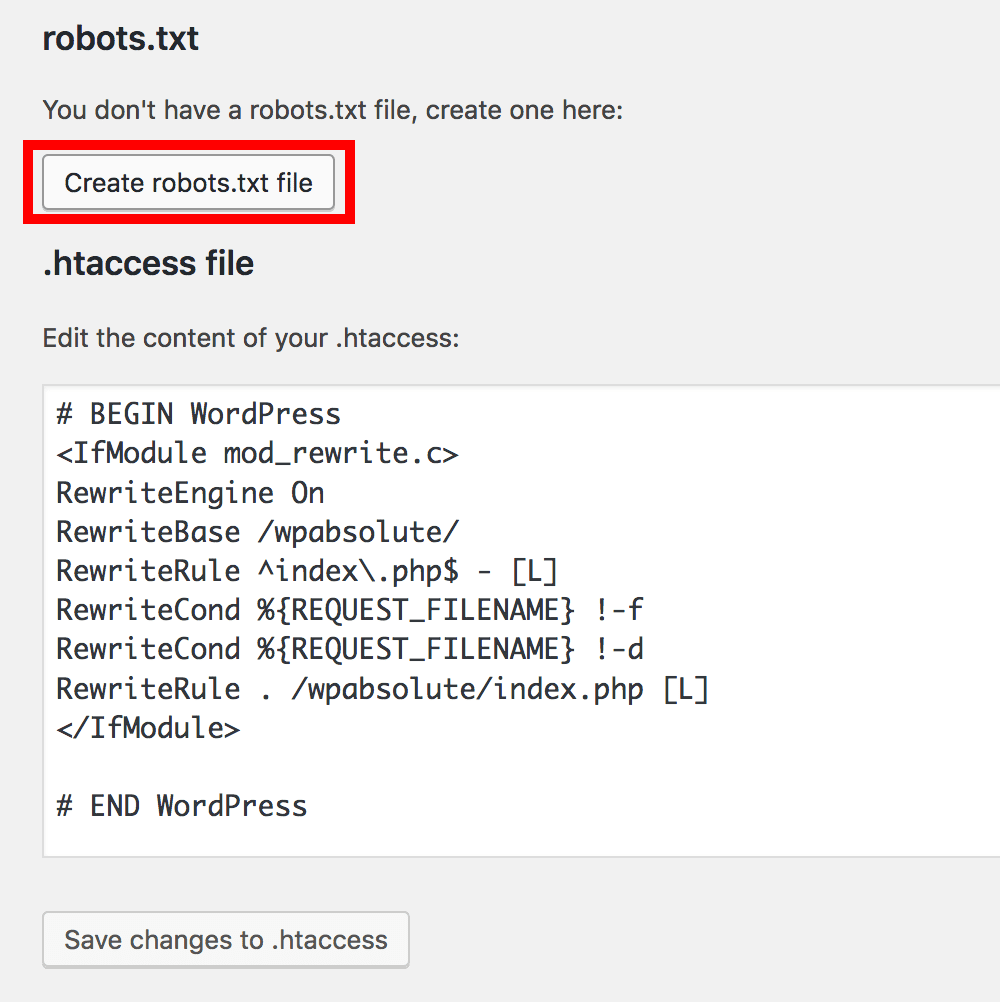
Both of these files are are advanced so if you do not know what you are doing then it is recommended you do not touch them once created.
If you misconfigure either of these files then you can ruin your entire sites SEO so make sure you are only making changes if know what you’re doing.
Import and Export: Import and Export is a tool that lets you do just that. You can backup your Yoast SEO settings and import them again.
This is handy when you want to carry the SEO settings that you spent so long setting up to another site or simply as a backup in case you mess things up in the future.

This tool also allows you to import settings from other SEO plugins. The other SEO plugins that you can import from include: HeadSpace2, All-in-One SEO, Jetpack SEO, Ultimate SEO, SEOpressor, WooThemes SEO framework and wpSEO.
Search Console
The Search Console page that is accessible from the Yoast SEO submenu displays any errors that may be occurring on your site. It displays mobile, tablet and desktop errors sorted in tabs.
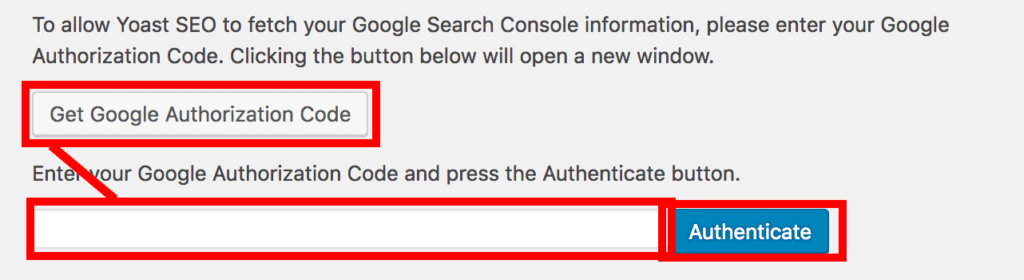
If you did not authorise your Search console in the initial setup wizard then you can do so here. To allow Yoast SEO to fetch your Google Search Console information, you need to authorise it with your Google account.
Click the Get Google Authorisation Code to open a new window. It will ask you to log into your Google account and will ask for permission for your website to have access to your search console data.
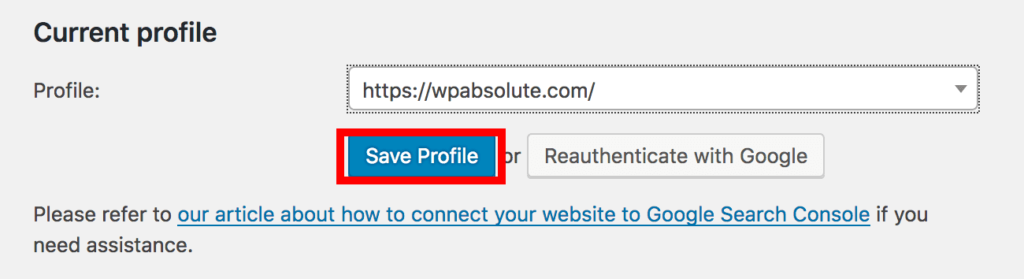
Once you click yes, the window will display a code which you have to copy and paste into the field. Click the Authenticate button for your website to display all of your search console profiles. Select your websites console and then click save.
The Desktop Smartphone and Feature phone tabs will then display showing any errors that may be. You can hover over each error to either create a redirect, view or mark as fixed.
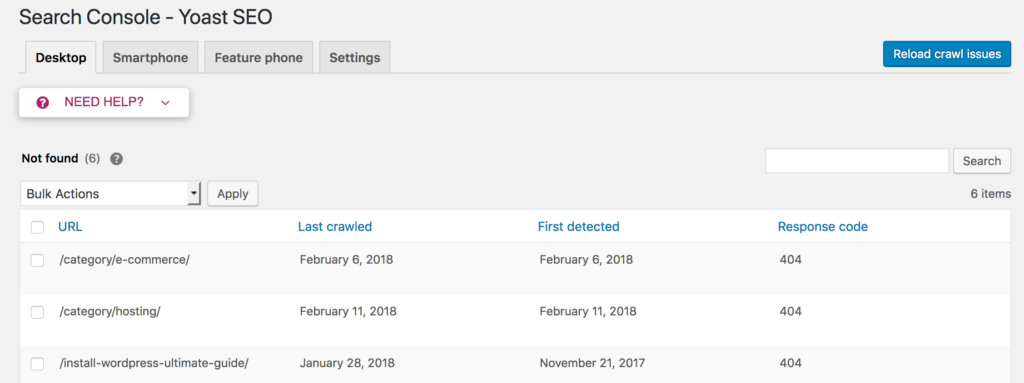
To create a redirect from that menu, you need to have the premium version of Yoast SEO.
How to use Yoast SEO
Yoast SEO does an amazing job of adding in a lot of SEO just by installing the plugin. Having said that, to get the most out of this plugin and truly optimise your website, you need to configure Yoast on a per-post basis.
This may be a huge job if you have several posts all needing optimisation however if you do this after each time you create a post then it is not such a big job.
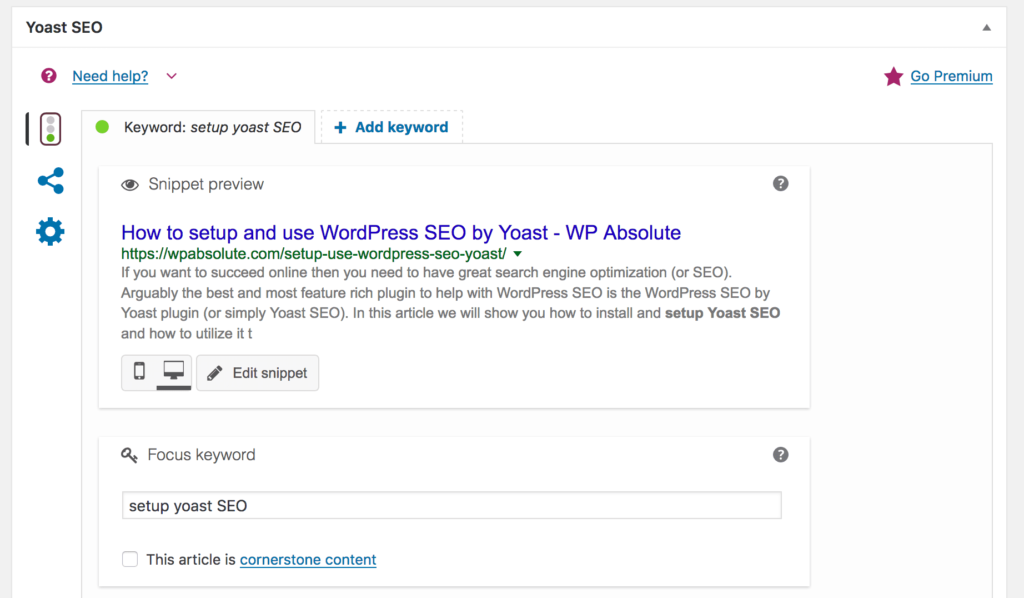
When you open up any new or existing page or post you will notice there is now a Yoast SEO metabox underneath the editor. This is where you will utilise Yoast SEO the most. It allows you to configure the title and meta description among many other options for that post.
When you fill out the fields in the Yoast SEO meta box, you are providing SEO for that post.
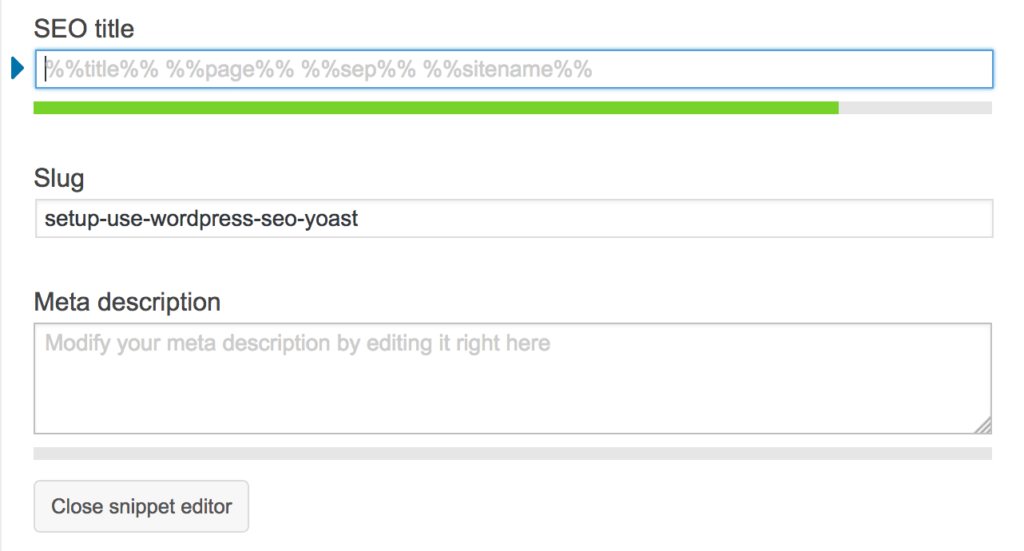
The metabox includes a snippet preview so you can see what the content will look like in Google search results.
When you optimise your posts for SEO, you should make sure each post is focused around a particular keyword. For example, this post may use the focus keywords of setup Yoast SEO. When you enter the focus keyword, it helps to highlight whether your post has been optimised and will highlight any problems underneath.
Your best judgement is required here but in most cases if you fix all of the problems then your post will be the most SEO optimised it can be for that keyword.
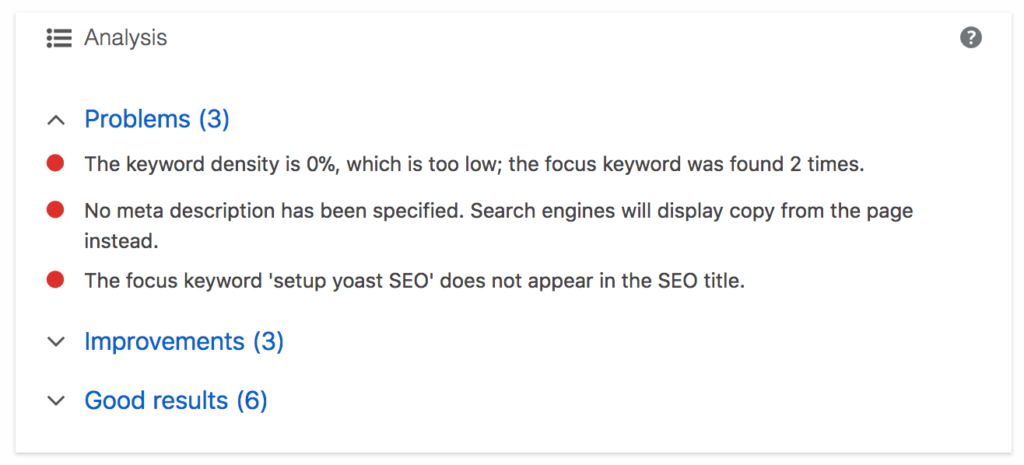
Once you have fixed a problem, the analysis sections will update from red and orange dots to green dots indicating good results. Remember that these are just guidelines so it is not imperative if the analysis is not 100% green.
On the left side of the Yoast SEO metabox are three tabs. There is the Content Optimisation tab, Social tab and Advanced tab. The content optimisation tab focuses on optimising what you have written in the editor above.
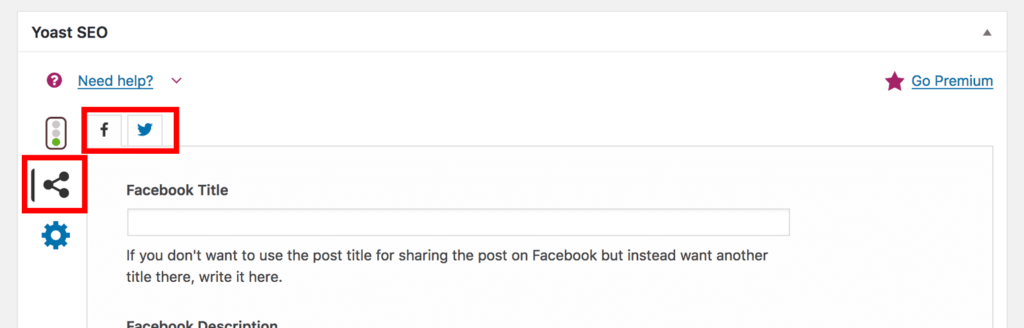
The social tab helps you optimise what your post will look like in Facebook and Twitter. You can customise and tailor the title, description and image for these social profiles.
Finally, the advanced tab lets you set the behind the scenes settings. The advanced tab lets you set the meta robots index and follow tags as well as change the breadcrumbs title and canonical URL.
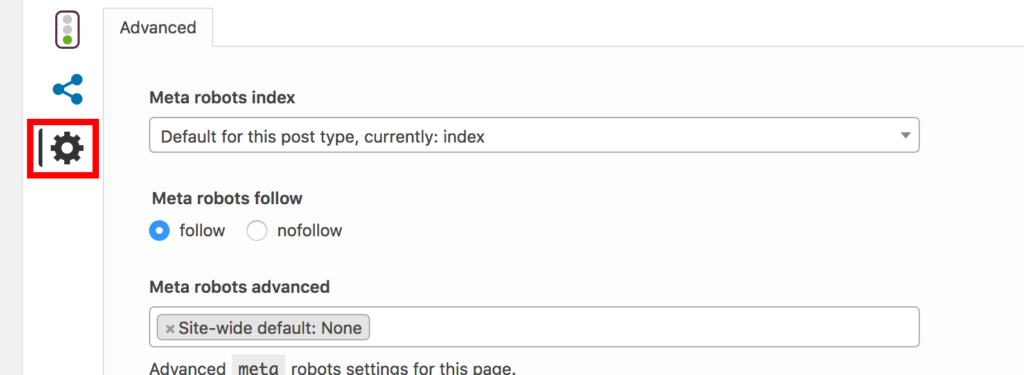
In most cases you will not need to touch the advanced tab and you can just leave them as their defaults.
Just like on each of the posts and pages edit pages, there is the SEO metabox on all of your custom post types and taxonomies as well. That means that you can choose to SEO optimise your categories and tags too. Remember that the SEO box will only show if the Yoast SEO Metabox option is set to Show in the Title and Metas settings page for each post type and taxonomy.
Conclusion
This guide has covered the initial setup process of Yoast SEO and how to use Yoast SEO to optimise your content for search engines. SEO is a lot of work but if you properly optimise all of your content then you will have the best chance of outranking your competitors in the search engines.
SEO requires a lot of ongoing work but as long as you lay the foundations on your site then your efforts will stand the best chance on search engines.
Have you subscribed to our Web3 YouTube channel and Web3 Facebook page yet? Join the community and discover the latest WordPress tutorials as soon as they become available on these channels.
Is your site using Yoast SEO? If not, I hope that this tutorial helped you get it up and running on your website. Learn more about WordPress SEO in our SEO service page.
Do you have any secret tactics to further optimise your website for SEO? Let us know in the comments below.