
Google Tag Manager is one of the most powerful tools that you can on your website or mobile application.
In this article, we’ll define exactly what Google Tag Manager actually is, why you should use it and how to set it up.
Table of Contents
- What is Google Tag Manager?
- Why you should use Google Tag Manager
- Setting up Google Tag Manager & installing Google Analytics
- How to install Google Tag Manager correctly into your website
- Installing Google Tag Manager directly into HTML source code
- Installing Google Tag Manager directly into WordPress source code
- How to check if Google Tag Manager is working
- How to install Google Tag Manager through a plugin
- How to install Google Tag Manager into Squarespace
- How to install Google Tag Manager in Wix
- Setting Up Event Tracking in Google Tag Manager
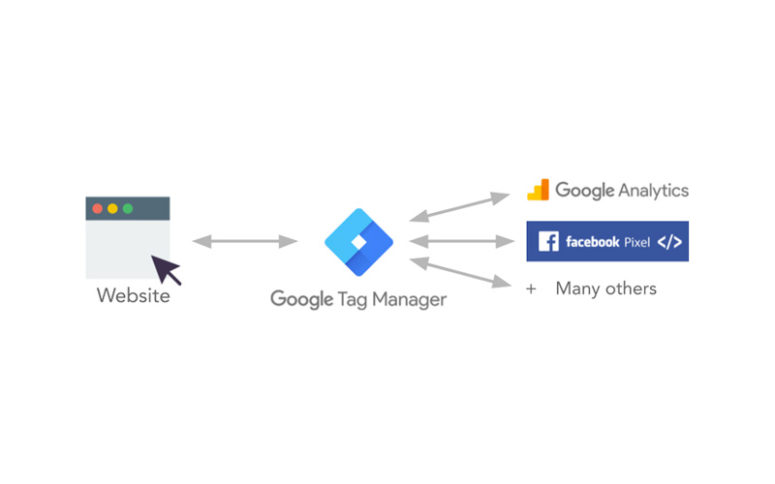
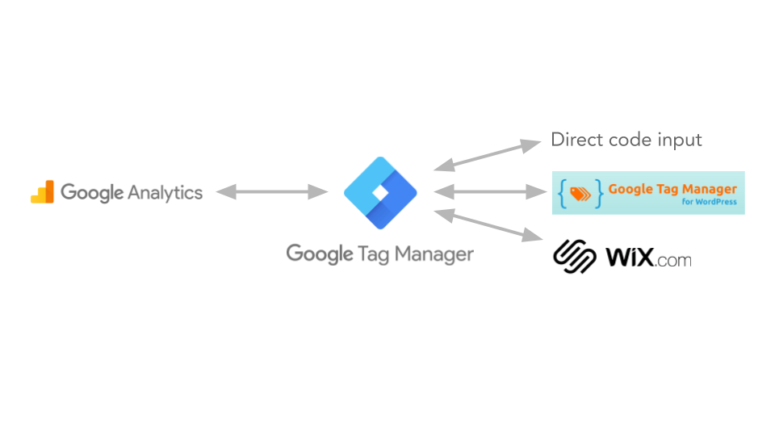
In a nutshell, Google Tag Manager acts as a bridge between your website and your marketing scripts such as Google Analytics, Facebook pixel and many other tools that track website traffic.
Google Tag Manager consists of three core components:
- Tags
- Triggers
- Variables
Tags are marketing scripts or measurement codes that collect information such as Google Analytics or Facebook pixel.
But tags are not just limited to marketing scripts – they can also be JavaScript layers or things such as Web forms or even live chat widgets. And the best thing about tags is that you can control, manipulate and manage them through Google Tag Manager triggers that tell the website where to load the tags.
For example, you may want to have Google Analytics loaded on all of your website’s public facing pages so the data can be recorded in Google Analytics. In that case, you would set a trigger to tell the Google Analytics tag to fire on all pages.
Variables then allow you to set specific controls and functions on how you want your tags and triggers to work.
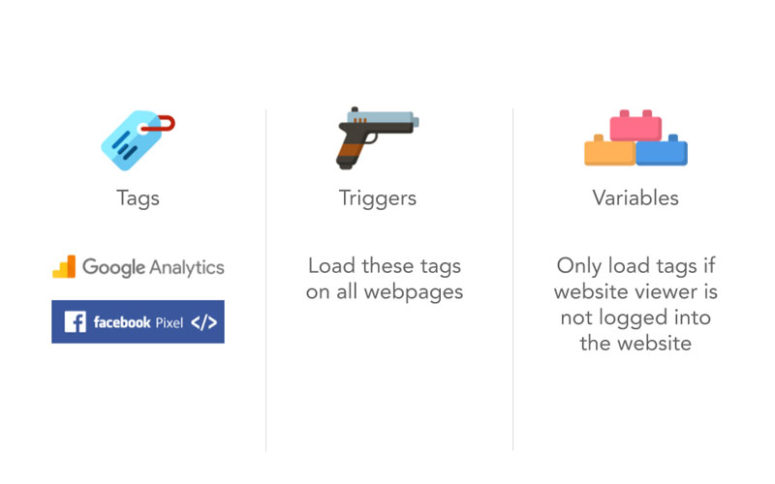
One specific example, as shown above, is using Google Analytics to fire on all public facing pages, then setting a variable to not fire the Google Analytics tag for people that are site administrators or developers who are logged in to your website.
By doing so, we’re not counting their sessions against your public information or your public data.
In effect, you’re not getting an intermix of what people are doing on your team versus what the public is doing on your website which allows you to have clearer and more accurate tracking data.
This is just one example to show how powerful yet simple Google Tag Manager can be, allowing you to easily set and manipulate these variables to control everything.
Why you should use Google Tag Manager
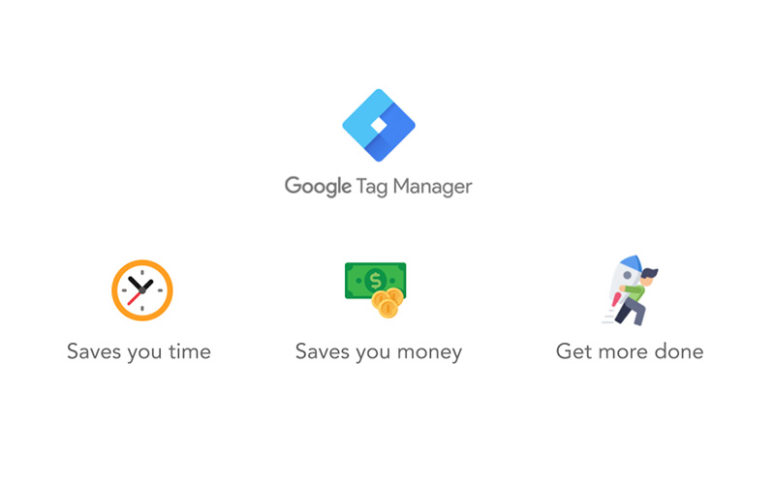
The benefits of using Google Tag Manager can be broken down into three things.
First, using the tool saves you precious time. Whereas before, managing scripts and tags manually and without having a centralised way to manipulate and control them through a graphical user interface, takes a lot of time.
But now, with Google Tag Manager, you really don’t touch any code aside from copying and pasting stuff across the web. It really saves you so much time to do other stuff, such as taking care of your business.
Aside from being a time-saver, it also allows you to save on money. If you’re hiring people, you may have developers or marketing consultants on your staff. If the platform is already set up, it will save them a stack of time, therefore you save money and allows you to simply get more done.
It unlocks a lot of the functionality that would be very difficult to achieve prior to Google Tag Manager being put in place. It allows you to do more with your marketing scripts and with your tracking and analytics that otherwise would have been difficult to achieve in the past.
Let’s look at the old way of how you used to do these things prior to Google Tag Manager:
- You have to go into Google Analytics and get the analytics tracking tag.
- If you’re running Ads, you’d have to get the Google Ads tracking tag.
- If you’re using an additional marketing platform for CRO work such as Hotjar, you have to go into Hotjar and get the marketing tag.
- If you’re using things like LinkedIn conversion tracking, you’d have to go in and get the marketing tag.
- If you’re using things like CRM insights and tracking such as HubSpot, you have to get the Hubspot tracking tag.
Once you have all these tags, you basically put them all into your website’s source code for it to work. So that sounds like a lot of work – a lot of tedious work.
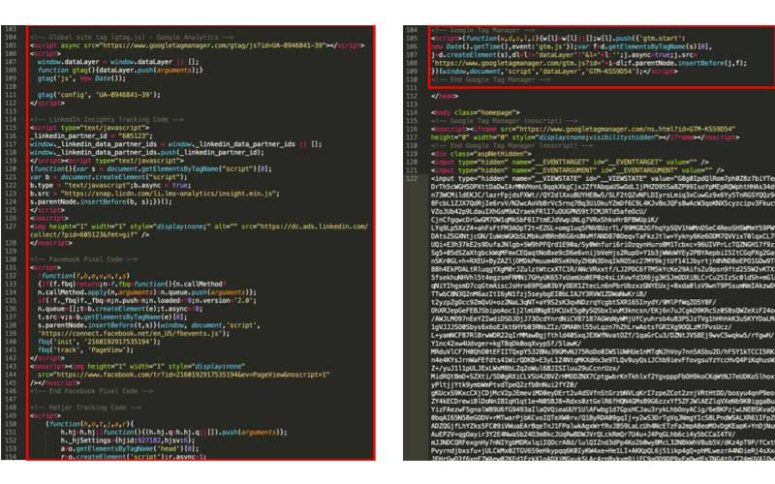
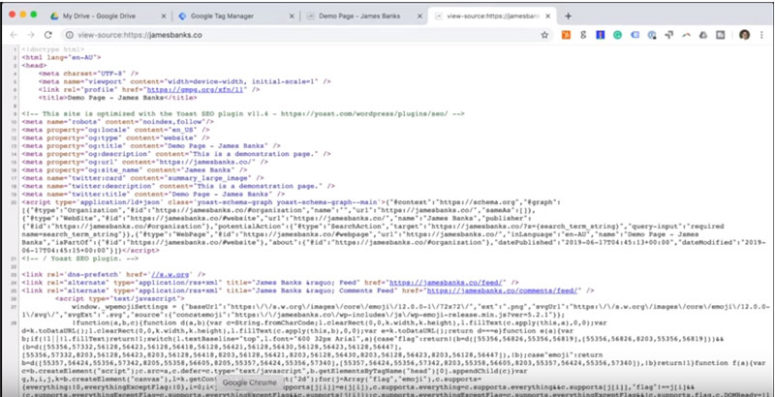
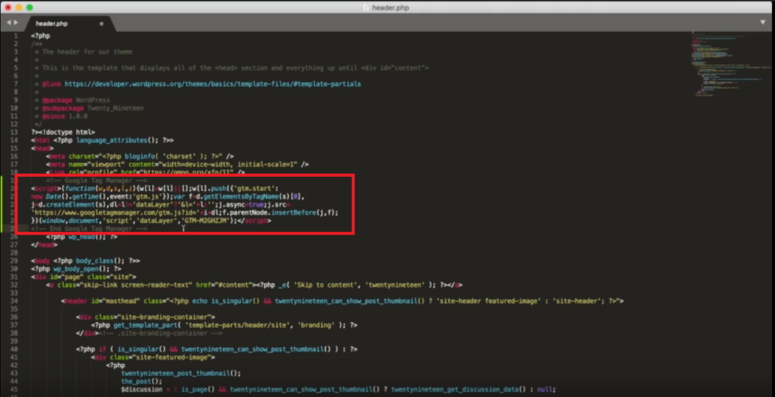
Now let’s look at this from an actual code implementation point of view. On the left-hand side of the image above, you can see where the marketing tags have been manually pasted one after the other in the header of the website so that they would function.
Google Tag Manager simplifies the process and replaces all of these. Basically, you just add these tags into Google Tag Manager using the graphical user interface, then Google Tag Manager controls how these tags feed into your website and what they do.
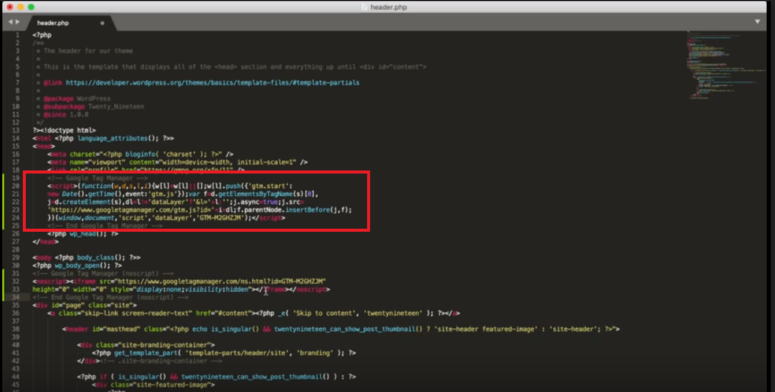
You only need to put in one script (see image on the right), and that’s it! Everything else is then controlled out of Google Tag Manager, making the actual code of the website cleaner and easier to maintain and manage.
Setting Up Google Tag Manager & Installing Google Analytics
Now, let’s dive into setting up and installing Google Tag Manager.
Create a new account and container:
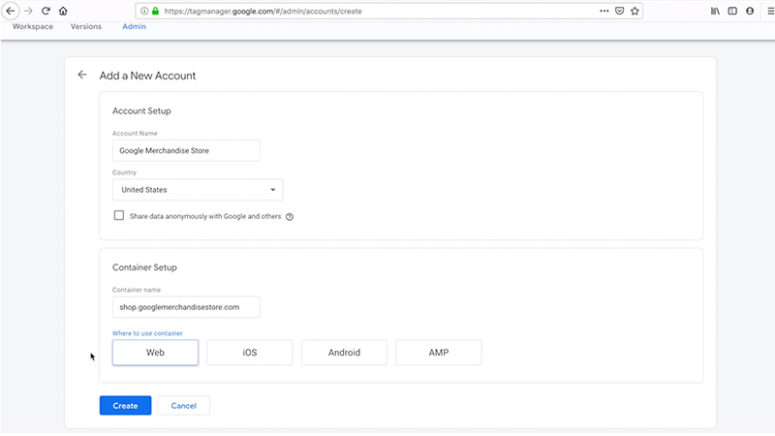
- Create account – Once you’ve logged into Google Tag Manager, the first thing you’re going to want to do is hit the ‘Create Account’ button.
- Account name – Next, you want to start filling out the details of your Google Tag Manager account name. For this example, let’s use a demo site, the Google Merchant Store.
- Country – Since this is actually a global store but it’s headquartered in the U.S, let’s set the United States as the primary country of origin.
- Container name – Grab the URL and place it in the container name. Don’t include the https component and the backslash (/) and set it as a Web container. Then, click Create.
- Accept terms – Next, review the terms of service and click ‘Yes’ if you agree to the terms. And you now have your Google Tag Manager container set up.
Now don’t jump ahead and drop it into a website yet because it will do nothing. You actually now need to configure the container to function the way in which you needed it to function.
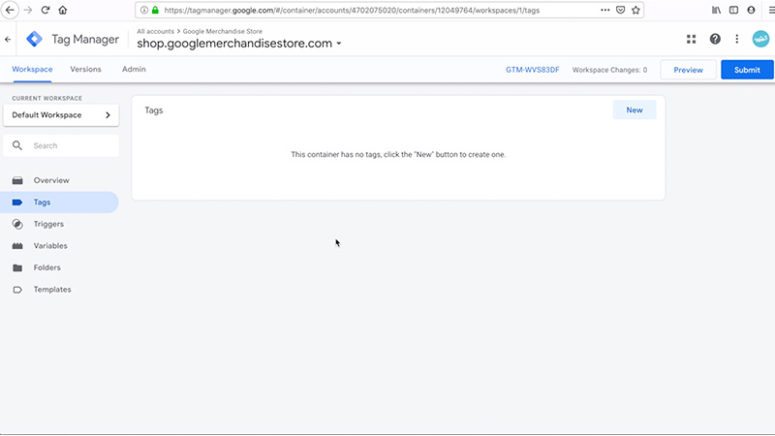
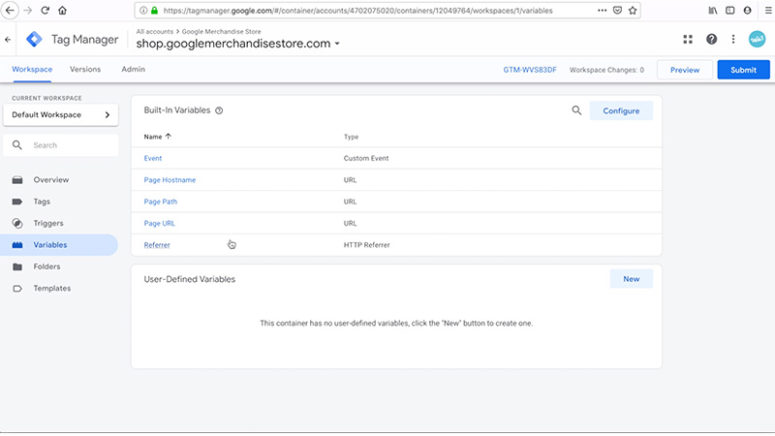
As you will see from below, if you go to the tag section, there’s nothing there that triggers anything, aside from a couple of out-of-the-box variables that Google Tag Manager provides when you install it. You will need to get this all set up first before you can put it into your website.
How to install Google Analytics into Google Tag Manager
Let’s start off with a simple, basic tag that you can put into Google Tag Manager, which is Google Analytics.
- So from the tag screen, hit the ‘New’ button.
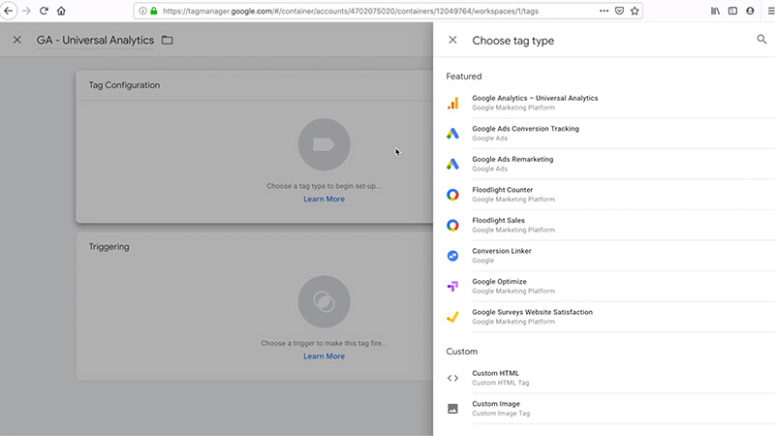
- Call the tag ‘GA-Universal Analytics’, where GA is short for Google Analytics. I recommend using these short form tags when you’re creating it and you’ll see once you have a very well built out container as to why you want to use this type of naming convention.
- Choose ‘Google Analytics’ as the tag type because you want to track page views of your website. Google Tag Manager has a lot of these tags pre-built. You can see from the image below that there’s heaps of them, so it will save you time by simply selecting one that exists in Google Tag Manager. If you don’t see the platform of the tag that you want to integrate listed out, you can always create a custom HTML tag.
Once you’ve created the tag, you now need to create a new variable.
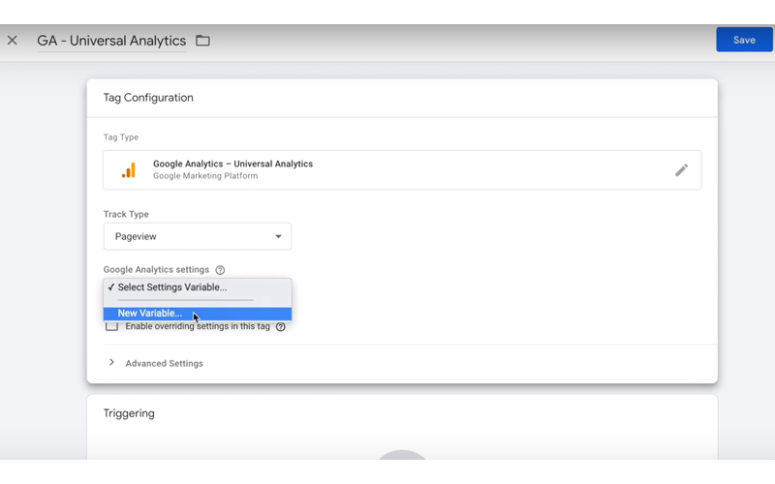
This is how you’re going to assign the Google Analytics profile to the Google Analytics tag:
1. Let’s call the new variable ‘Google Merchandise Store GA’ where GA is for Google Analytics.
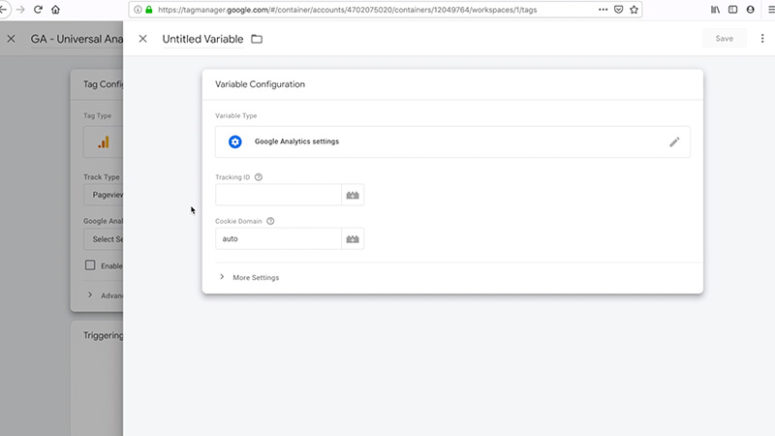
2. Set the Cookie domain to Auto. Next, go back to your Google Analytics account to get the Google Merchandise Store demo tracking ID, which in this case is UA-54516992-1.
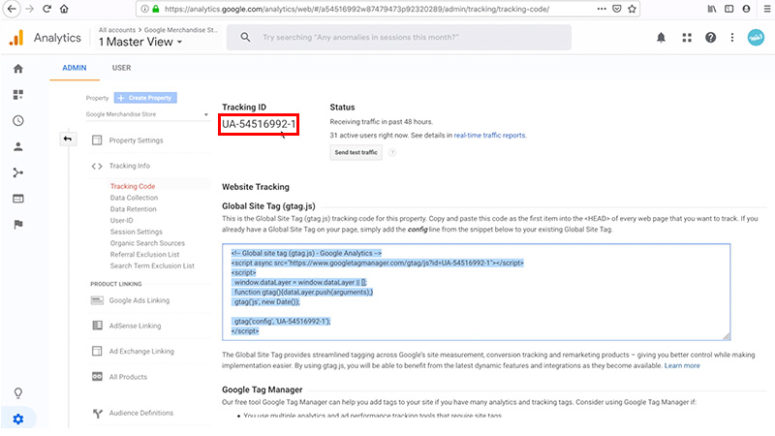
3. Paste the tracking ID in Google Tag Manager and hit Save.
Create a trigger
Next, set a trigger for this tag to fire on all pages and hit Save.
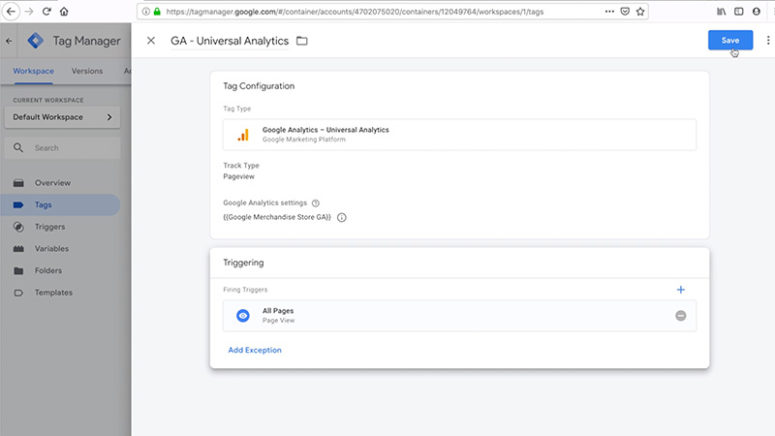
You’re done! You have created your first tag. If you were to go ahead and drop Google Tag Manager into your website, Google Analytics will load on all pages and will be delivered into the site via the Google Tag Manager script. It’s that simple!
How to install Google Tag Manager correctly into your website
You can easily mess up your website and your Analytics data if you don’t install Google Tag Manager correctly.
In this section, you’ll learn how to install Google Tag Manager correctly into your website. If you haven’t done this already, please feel free to check out the previous section above where you’ll learn how to set up Google Tag Manager and integrate Google Analytics into it.
Let’s start off inside Google Tag Manager. The first thing that you’re going to need to do is to get your Google Tag Manager integration code out of your Google Tag Manager container that you want to connect to your website.
How do you do that? Well, it is quite easy.
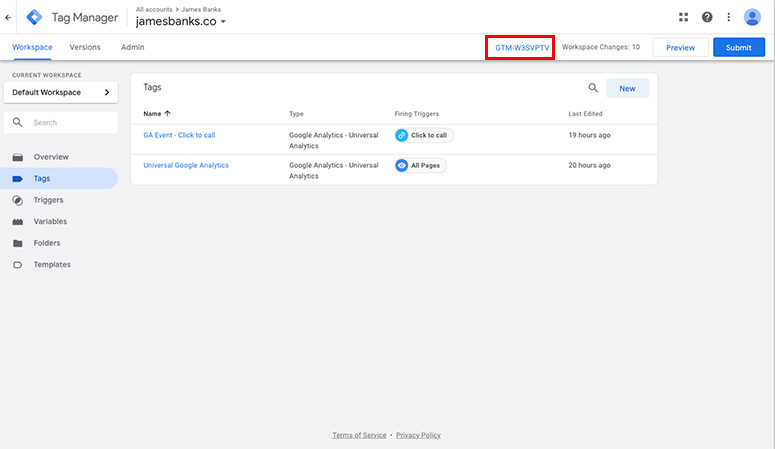
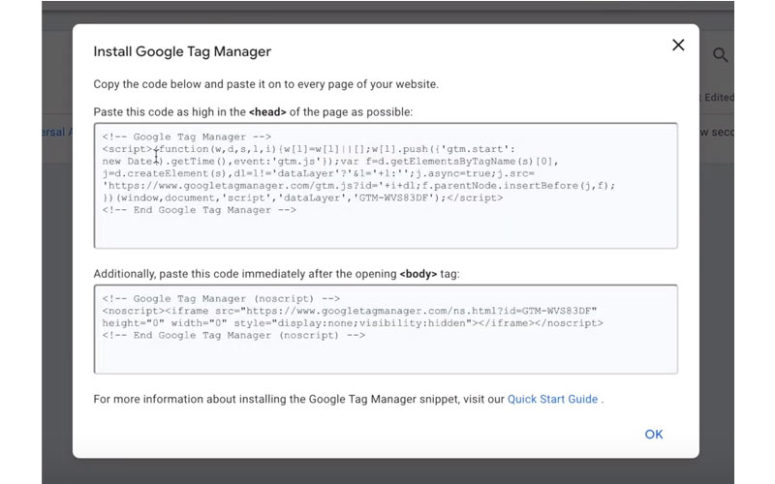
You simply go over to your Google Tag Manager container and find the ‘GTM-‘ and then a bunch of letters and numbers button. This will be sitting beside the preview button inside your container. Simply click on that and that will open up a little window that will give you two pieces of code – one will be an integration code for your website header and second is a backup integration code for web browsers that have JavaScript disabled.
Installing Google Tag Manager directly into HTML source code
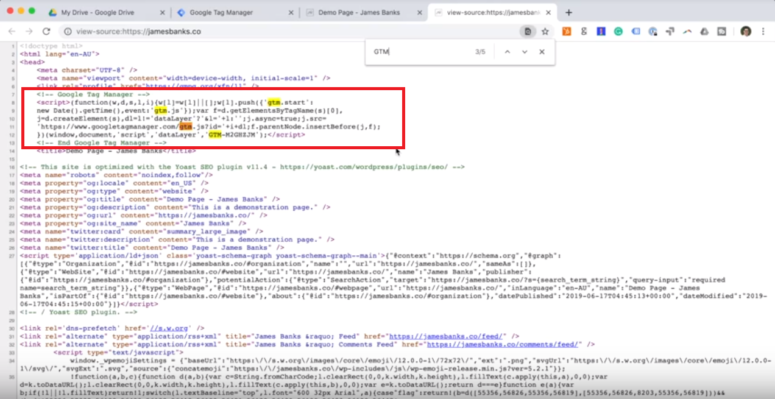
The following example will show you how to do this on an example website, jamesbanks.co
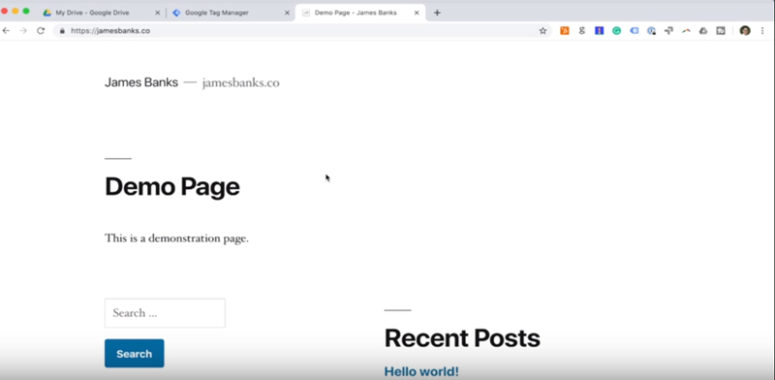
It is a WordPress website, but the actual website source code renders out in HTML and CSS.
Note: Never make these changes on your live web server until you have tested them first on either a development & staging environment. Making mistakes here can cause your website to break, which is what we do not want!
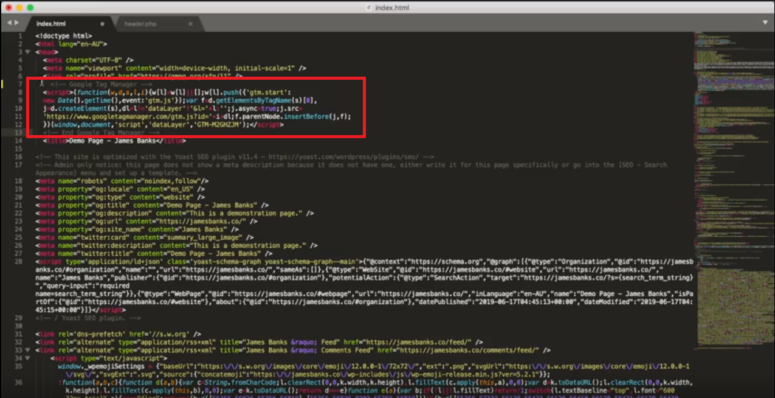
What you want to do with that integration code that you have retrieved from Google Tag Manager is to put it as high up as possible in the head of the website source code. In this example, it’s above the site title.
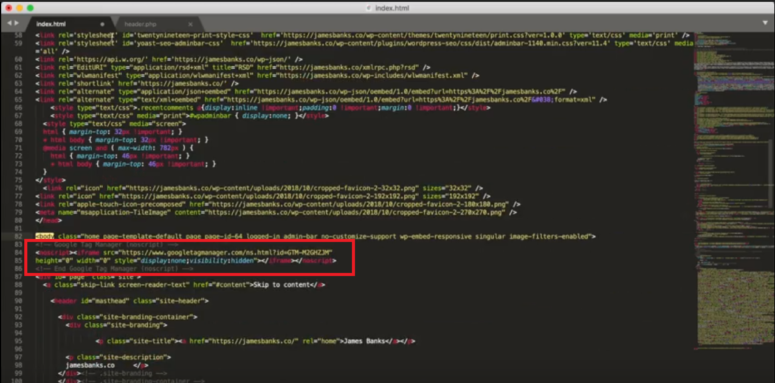
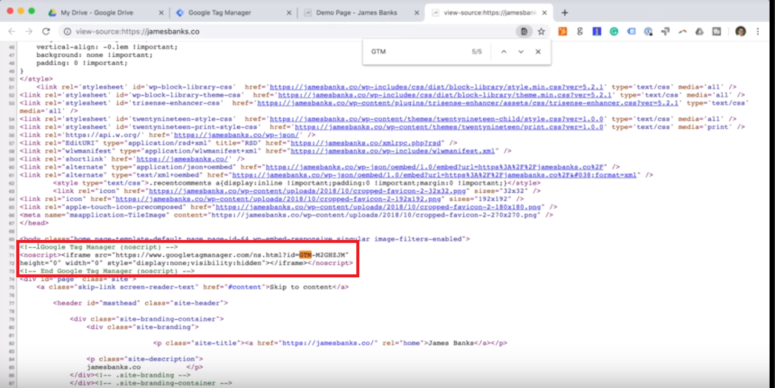
And secondly, place that backup script for sites that have JavaScript disabled from or just underneath the actual opening body tag in the website. An easy way to find the right area is you can just do a control search for ‘<body’ to get you to that exact location. From there drop in the script directly underneath opening body tag.
Installing Google Tag Manager directly into the WordPress source code
The WordPress website example is running the bare bones basic out-of-the-box WordPress Twentyninteen theme.
A child theme was created to ensure that any changes you’re making won’t hard overwrite the actual core theme.
This is a WordPress best practice to ensure when your core themes are updated, you’re not having your changes getting lost and having to re-add in Google Tag Manager every single time you update your theme – which would be an absolute nuisance.
Here are the steps to integrate Google Tag Manager directly into your WordPress code:
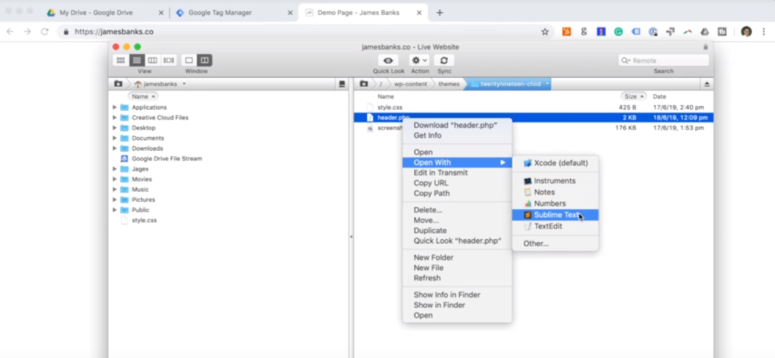
1. From the child theme, open up the header PHP file. Move it from the parent theme to the child theme folder.
2. Do exactly what you did with the HTML website. Take that head code from Google Tag Manager, and then place that just after the meta titles and profiling information in the head of the website.
3. Place the backup script, the no script, just after that opening first body tag in the website.
4. Hit save to push the updated code file into the web server.
5. Refresh the website page. Next, open up the website source code again. If you have a large source code file, a quick and easy way to find out if it’s actually worked is to hit Control+F, type in ‘GTM’ then you can see if you’ve got the head tag deployed correctly in the right place. And also the no script has been deployed directly after the opening body tags.
How to Check if Google Tag Manager is Working
If you want to double check if Google Tag Manager is working:
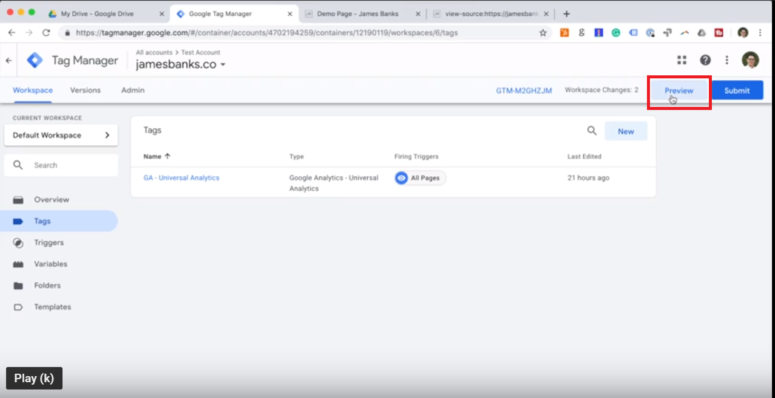
1. Go back to Google Tag Manager.
2. Hit the preview button, which is next to the submit button, that’s going now to reload Google Tag Manager.
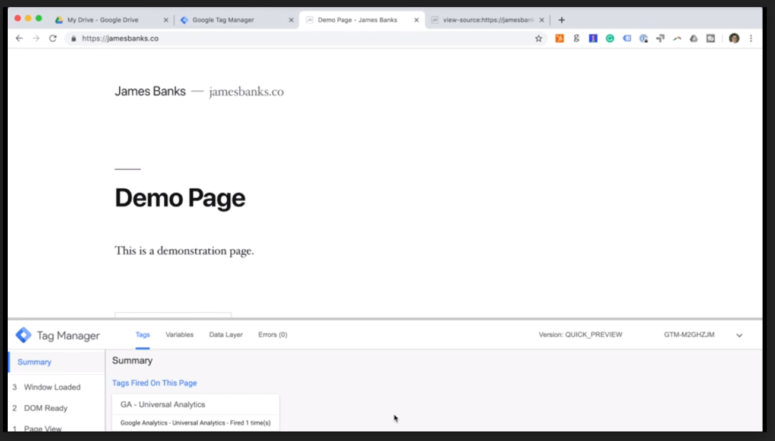
3. Now that preview mode is enabled, go back to the website where you have Google Tag Manager installed.
4. Refresh the page and you will see the Tag Manager’s preview window or window fire at the bottom of the page.
Another way to check to make sure everything is working is with the Tag Manager Assistant. It’s a browser app for Chrome only. You can download and install it into your Chrome browser here.
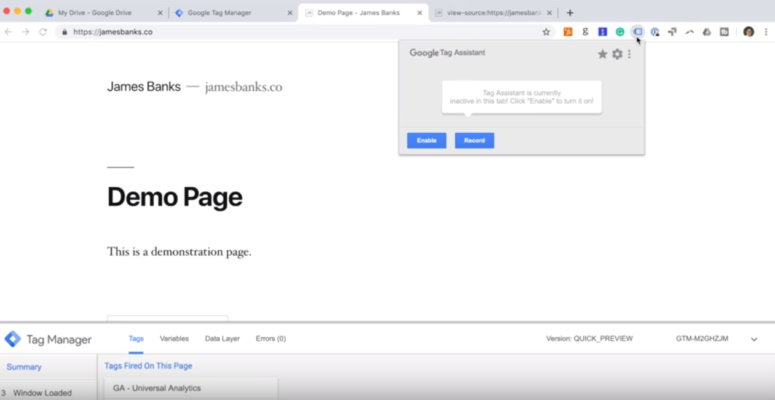
Here’s how to use it:
1. Hit the ‘Enable’ button and then turn on the actual recording from within the widget
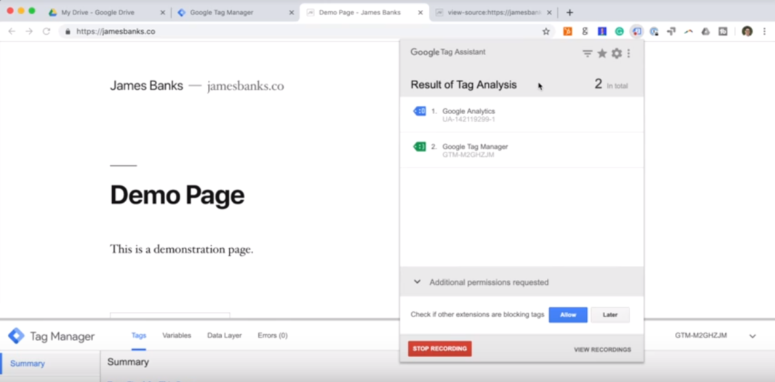
2. Once it’s recording, reload the web page and you will see if you open up that Tag Manager assistant – number one, Tag Manager is firing. If you see a little smiley face it means it’s working, And number two, Google Analytics is firing, too.
So, a cool tip with this – you can actually run the test with the Tag Manager Assstant on any website. You don’t have to own the website. You can have it on anyone’s. You can look at your competitors to see which tags they are firing on their websites to get a bit of intelligence on what your competitors are doing.
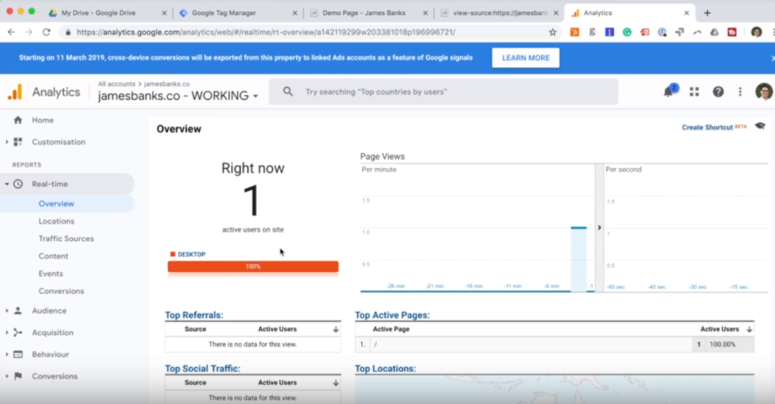
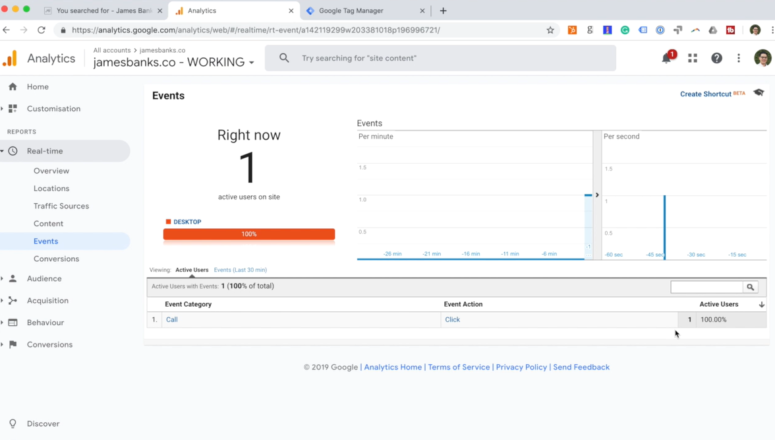
Before we move on, one last thing you need to do to make sure that this is indeed working correctly is to actually go over to the website’s Google Analytics profile and open up the real-time overview report. Check if you’re active in the real-time Google Analytics view on the website.
Installing Google Tag Manager through a plugin
Next, this is how to do install Google Tag Manager through a plugin. First, get the plugin set up.
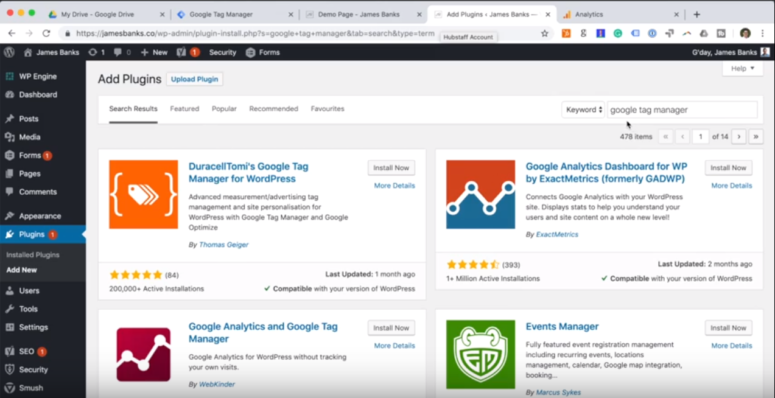
1. Go to the plugin section
2. Hit ‘Add plugin’
3. Search for ‘Google Tag Manager’. The first one that comes up should be the Duracell Tomi’s Google Tag Manager for WordPress by Thomas Geiger. This is the one we recommend using as the plugin does the job. Hit ‘Install’
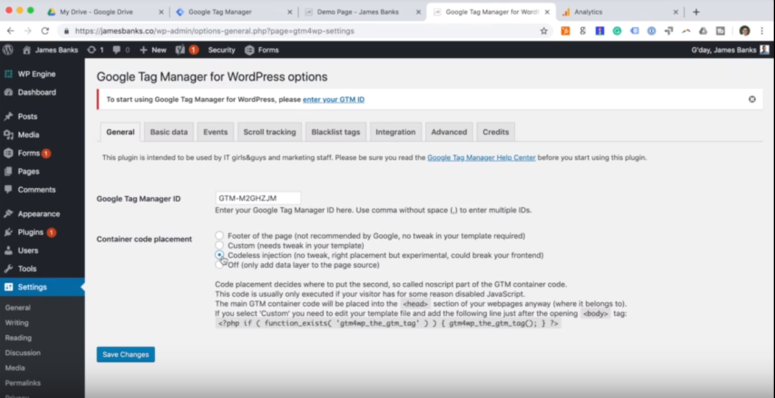
4. Now that the Google Tag Manager plugin is installed, go to Settings. There’s two things you have to do first. You got to get your actual Google tag manager ID. So once you’ve got that you got to go and paste that into the Google tag manager plugin ID settings.
There’s a number of ways this plugin can pass Google Tag Manager code into your website. Codeless injection is the one recommended. That way, you don’t actually have to do anything. You can just simply set codeless injection.
5. Hit Save and once that’s been saved, go back to your website and do the same process you did before. From Google Tag Manager, enable the preview window. And reload the page. You will see that the Google Tag Manager code is firing correctly, and also Analytics is firing correctly. And also showing you’re active in the real-time Google Analytics view on the website.
Installing Google Tag Manager into Squarespace
Next, let’s move on to how to install Google Tag Manager into Squarespace.
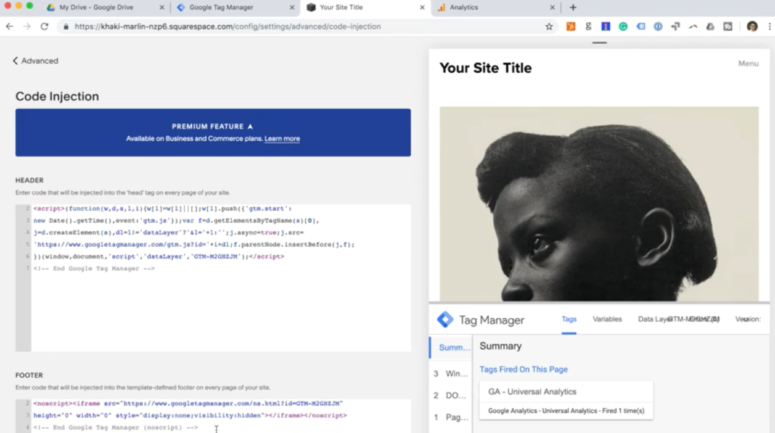
1. So once inside the Squarespace Control panel, what you’re going to do is go to Settings / Advanced / Code injection. Keep in mind, if you want to install Google Tag Manager into Squarespace, you’re going to need the premium plan to do this.
2. Place the two scripts that you used in the direct implementation. The head code should go into the header section in the Squarespace editor. And the body backup no script code should go into the footer section. Although this is not semantically the right place to do it, it does actually work fine.
3. Hit Save
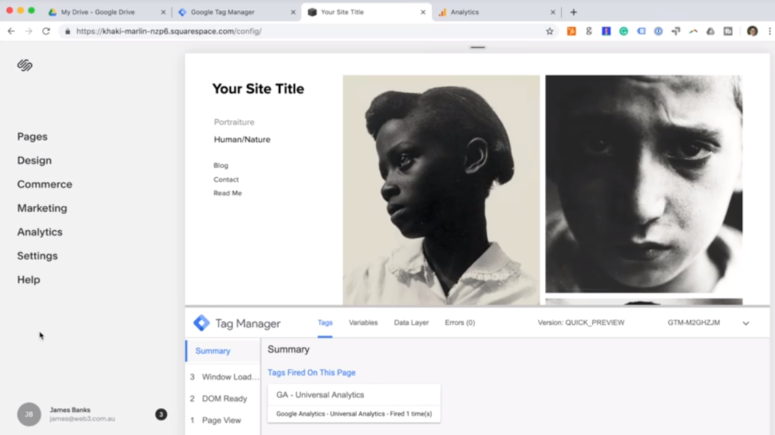
Once that has been saved, go back and open up your website into the full view. Enable preview mode again in Google tag manager, reload the page and you will see that the Google Tag Manager container is working correctly. It’s showing the preview window, and also Google Analytics is loading into the website correctly, as well.

Installing Google Tag Manager in Wix
Finally, this is how to install Google Tag Manager into your Wix website.
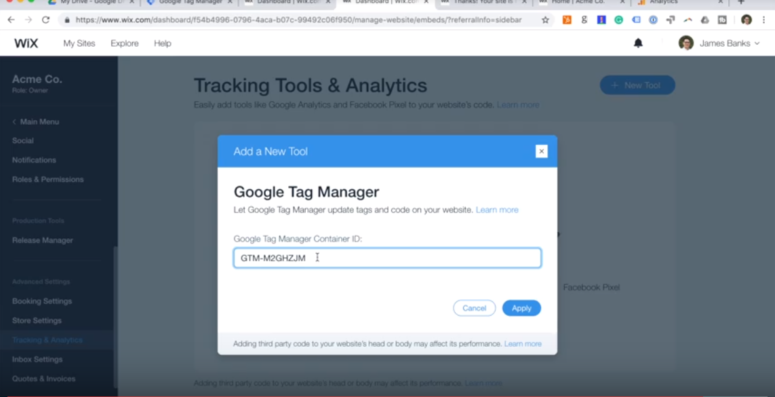
1. From the Wix dashboard. go to Settings / Tracking & Analytics
2. Go to New Tools and select the Wix prebuilt Google Tag Manager tool.
3. Just like how you did in the WordPress plugin, grab your Google Tag Manager ID and drop it into the Wix pop up and hit Apply.
As you can see you can turn it on and off but that’s essentially it. Once it’s installed, it will go into your Wix source code in the correct place. Set and forget and you’re up and running.

Setting Up Event Tracking in Google Tag Manager
Listen on iTunes Listen on Stitcher Listen on Spotify Listen on SoundcloudEvent tracking allows you to track specific elements and events that occur on your website, such as link clicks, button clicks, downloads, for example, someone downloading a pdf guide off your website, your forms being submitted when people play videos on your website etc.
The key thing to understand is that all of this tracking data is absolutely useless if you’re tracking goals are not aligned with your business growth goals.
Questions to answer before getting started
There are really three key questions you need to ask yourself before you get started with event tracking and conversion tracking on your website:
- How much do I want to grow my business and by what timeframe?
- What are the results that I need to achieve in order to reach this growth goal? Specifically, what type of actions need to happen with my website and with my online audience for this greater growth goal to be achieved?
- How will I track and measure these goals so that I can report later on if I’ve achieved the results or my objectives or if I have not?
Here’s how we answer these questions for our clients at Web3. Before we get started with any type of online media or marketing work for them, we do two things:
- We conduct something called an online opportunity analysis
- We also create what’s called online KPI roadmap
Let’s go through both of these exercises to better explain how you can apply this to your business.
How to Conduct an Online Opportunity Analysis
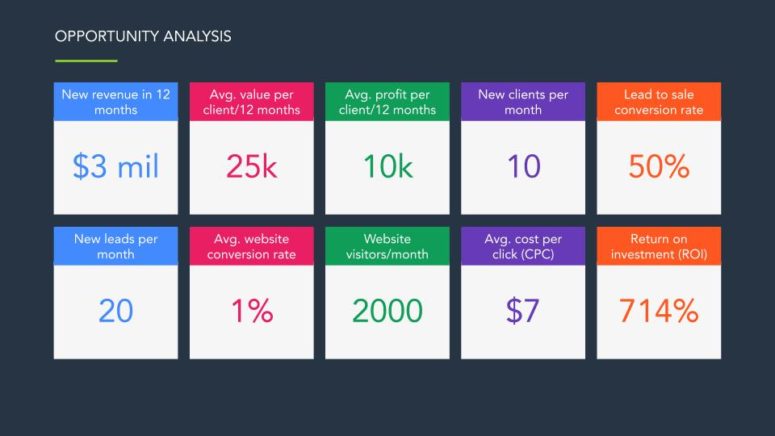
- Let’s say the greater business growth goal that you want to achieve in 12 months is $3,000,000 in new revenue.
- You know that from that $25,000, your average profit per client is $10,000 across 12-months.
- You know that from that $25,000 that your average profit per client is $10,000, again across that 12-month window.
- So if you want to gain an additional $3,000,000 in new revenue across a 12 month period, you need to win 10 new clients per month at an average value per client of $25,000.
- You know that your lead to sale conversion rate is approximately 50%.
- Therefore, you’re going to need at least 2,000 website visitors a month to get that 20 new leads per month. That is: 2,000 visitors at converting at 1% on the website will get you those 20 new leads per month.
- You know your average website conversion rate is around 1%.
- Therefore, you’re going to need at least 2,000 website visitors a month to get that 20 new leads per month that is converting 2,000 visitors at 1% on the website, is going to get you those 20 new leads per month that you need.
- If you were to achieve this with paid advertising, the approximately average cost per click to get those 2,000 visitors to your website is $7. That’s going to result around about a $14,000 advertising budget per month.
- However, you’ll achieve $100,000 in profit per month (that’s $10,000 in profit across 10 clients per month). If all KPIs are achieved, you’ll receive $100,000 in business profit for an investment of $14,000 in ad spend which gives you a 749% return on investment.
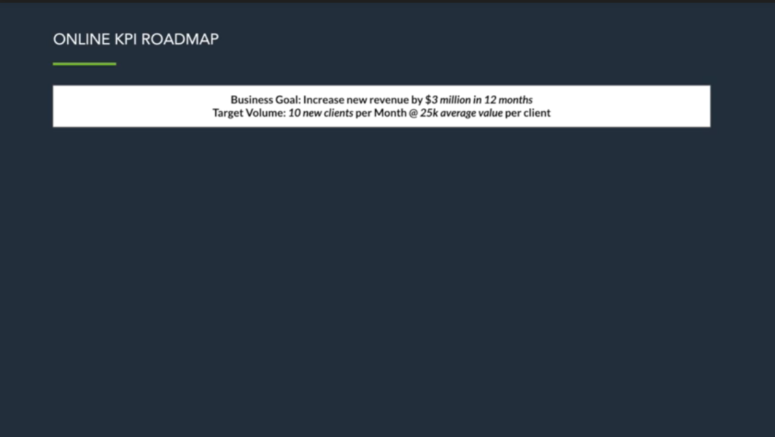
How to Create an Online KPI Roadmap
The next step after identifying the market opportunity via the opportunity analysis is to establish how your business is going to capitalise on the identified opportunity. This is were the online KPI roadmap comes into play.
Let’s walk through the exercise:
Phase one: Define the business growth goal. Increase new revenue by $3,000,000 in 12 months.
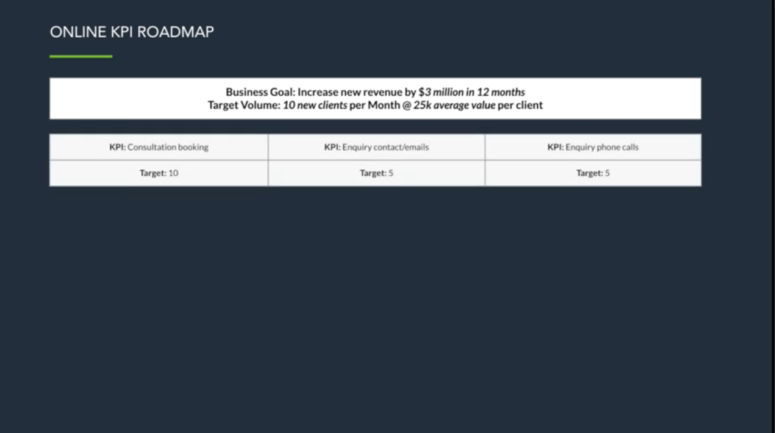
Phase two: define the target customer volume 10 new clients per month at an average client value of $25,000.
Phase three: break down that 10 new clients per month against the current 50% lead-to-sale conversion rate. That means you need 20 new leads a month. There are three points of conversion on the website you need to be tracking: Consultation bookings. The first step of my sales process is to get clients to book in that consultation.
- Enquiry contacts/emails: You know not everyone’s going to book a consultation right off the bat, so, therefore, you want them to come through your contact form, which is going to lead to you, eventually bringing them in as an enquiry into a book that consultation.
- Direct phone calls. A decent chunk of enquires come through where people simply calling us and wanting to book in that initial meeting,
In summary, you’re taking that goal of 20 new leads per month, you’re spreading it across the 3 conversions KPIs listed below to get to 20 new leads per month.
- 10 consultation bookings per month
- 5 enquiries via email or contact form
- 5 enquiries via phone call
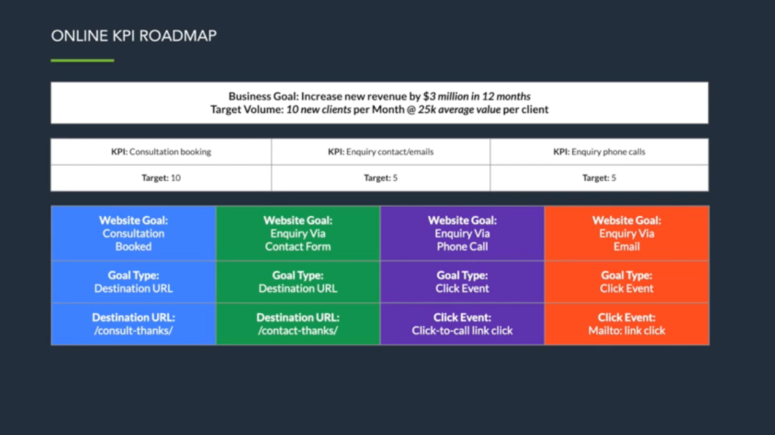
Phase four: The next step is to break down the goals that we need to track on our website to see if we are achieving these lead KPIs or not.
- The appointment booking tool on your website redirects the user to a dedicated Thank you page URL after they have scheduled a consultation. You can set up a destination goal for every person that lands on that consultation booking thank you page so you can attribute that session as a consultation booking conversion.
- You can even do this with your phone numbers on your website. You can enable a function called click-to-call such that when someone clicks on your phone number, it fires up their voice over IP, or if they’re on a mobile device, they see a phone number, they tap on it to call your business. This is called a click-to-call link. You can then set your click-to-call links as the tracking goal or event tracking a click event. This means that every time someone taps your phone number on your website, you’re attributing that as a captured enquiry phone call.
- The final one to apply is the same type of click event tracking to your mailto: website links. If you have an email link in your website footer on or on your contact page, when people click on that email link to open up their email messaging tool to send you an email, you can count those actions as an event that can then attribute to your KPI.
One quick thing to clarify before moving forward is that there’s a middle layer between our KPIs and these goals. If you’re running a website with a decent amount of traffic, you would probably realise that a fair bit of contact or a fair bit of information that you get on your contact forms are spam. So there has to be a lead quality filter to actually give you a true KPI, which is true sales qualified leads.
One quick thing to clarify before moving forward is that there’s a middle layer between our KPIs and these goals. If you’re running a website with a decent amount of traffic, you would probably realise that a fair bit spam that you get from your website conversion sources.
Therefore, there has to be a lead quality filter to actually give you a true KPI, which is true sales qualified leads.
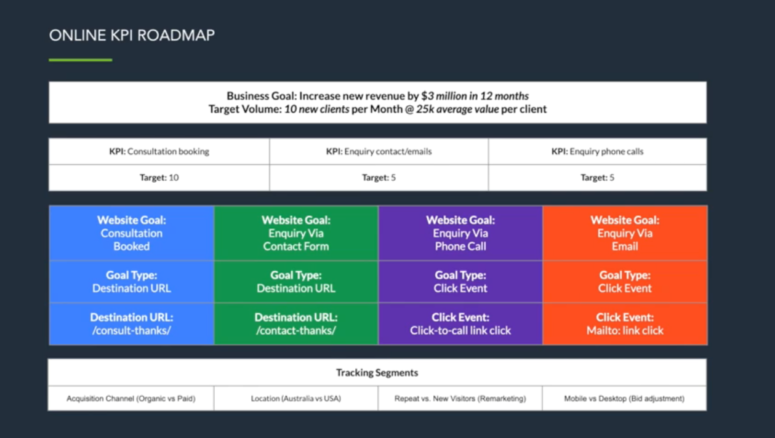
The final layer. and this is optional, depending on how your business is. But for example, if you are running both an organic search and a paid search advertising campaign, you want to make sure that you have your tracking statements set up so you can compare and contrast your conversions and KPIs that have been achieved through organic search versus paid search.
If your business is active in two different geographic locations, for example, Australia, the United States or if you have a multilingual website, then you’d want to set up your different locations and countries in segments to track the different conversions by country.
If you’re running a remarketing campaign, a useful segment would be repeat visitors that have come back to the website through remarketing – they’ve converted versus new visitors that have converted without any remarketing involved. And finally, one that we always like to set up is a mobile versus desktop segment to see which conversions are coming from mobile versus desktop.
Event Tracking in Google Analytics
Let’s move on to understanding exactly what makes up an event inside Google analytics and then how we can track this in Google Tag Manager.
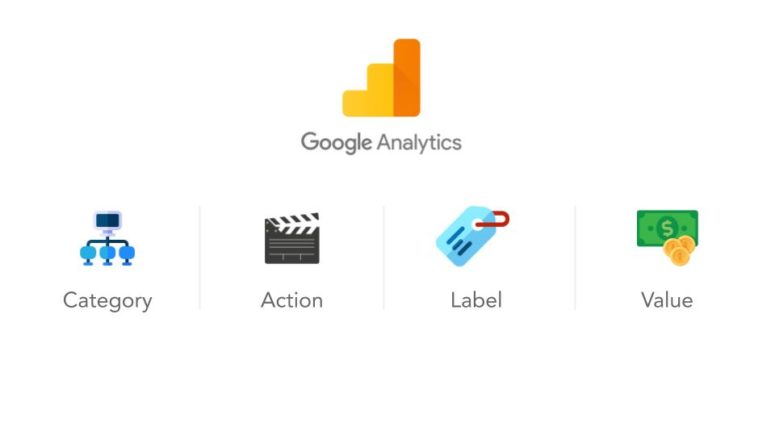
Events consist of four elements:
- Category
- Action
- Labels
- Value
Category
The category defines what the event is. An example would be a click-to-call link. In this case, we would categorise that event as a ‘phone call’.
Action
The action is what the user takes in order to trigger that event. So in this case, if we’re setting up a click-to-call event, the action the user needs to take is a click/tap. They need to click on that phone link or tap on it to fire to trigger the event.
Label
The label could be used to help give further contextualised information in where this event is happening on your website. We usually attribute the label to the actual page source.
What that means is when you pull up the event conversion goal within Google Analytics, the page URL will register as the event title. This will inform you on what page the event occured on your website.
Value
The value goal is mainly for e-commerce. If the event that you’re tracking results is a direct monetary conversion, for example, someone hitting the checkout button and paying for the product, you want to be able to attribute that event to the specific dollar value.
That way, you know how much money each event has generated for you. For events that do not result in direct monetary action, such as phone calls, we recommend leaving the value blank.
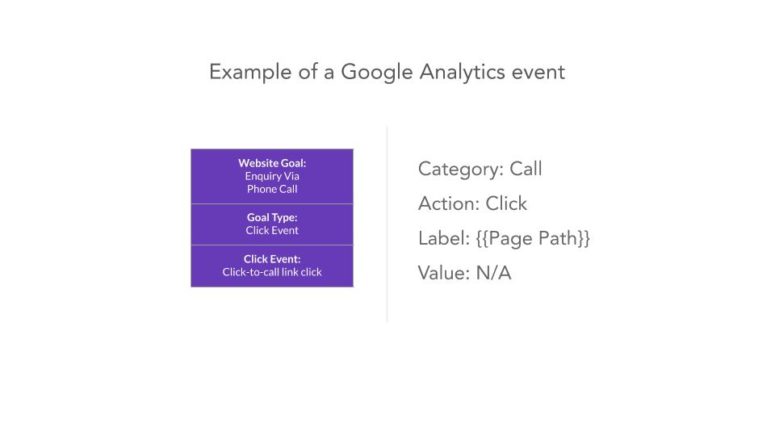
Here’s an example on how to configure a click-to-call event:
- You know a goal you need to be tracking on your website is enquiries from phone calls.
- The type of goal you’re going to set up is a click event
- The click event that you’ll be setting up on is your website click-to-call link.
- The category that you’re going to set this event up under will be a Call.
- The action the user will take to trigger this event will be a Click.
- The label that you want to attribute this event to will be the page URL that the event was captured on.
- And you’re going to leave the value blank because it doesn’t apply in this scenario with this event.
Why Should I Do Event Tracking in Google Tag Manager?
You might be thinking why do you need to involve Google Tag Manager? Can we just do this all in Google Analytics?
Well, you’re absolutely correct.
You can do this all on Google Analytics and set up event tracking directly on your website without needing to involve Google Tag Manager.
Unless you’re reasonably comfortable with handling JavaScript and then manipulating a website source code to include the JavaScript required to capture these events into Analytics, you can completely skip this with Google Tag Manager as it requires no code to set up event triggers.
So, for example, if you were to apply this click-to-call link tracking on all of your click-to-call links inside your website, you would need to apply Javascript for every one of these links to make sure that when these links are clicked, it’s going to actually pull the data out and send it to your Analytics report.
With Google Tag Manager, all you have to do is set up a couple of parameters and variables in the editor.
You don’t have to touch any code.
It’s much faster. It’s much easier to do. And when it comes to testing these things, in my opinion, a little bit more reliable than doing it the old fashioned way.
How to Setup Event Tracking on a Website
Let’s build a click-to-call event tracking trigger on the same demonstration website used previously which is set up under my personal domain.
The website we’ll be demonstrating is a WordPress website that has Google Analytics integrated into it through Google Tag Manager. If you’re not sure how to do this, feel free to review the previous sections of this article to learn how.
So here’s what you’re going to do:
We’ll start off inside Google Analytics account for this website.
1. First thing you need to do is go to the admin section & select ‘working view’.

2. Open up the goals section. Create a new goal. Select custom from the goal types and call that goal Phone Enquiry click-to-call and set that goal as an Event type.
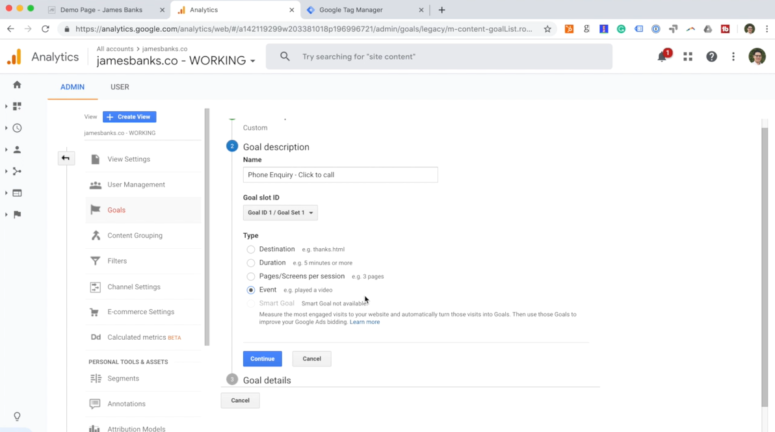
3. Next, fill out the goal tracking details. As shown in the previous steps in this article, the category to give it is Call. The action will be Click. Leave the label, the label and value perimeters blank. In this instance, Hit Save. And there you go. You have it done inside Google analytics.
Now, how do you actually get this goal to be registered on the website? Well, you’re going to do that inside the Google Tag Manager manager account that you’ve already set up.
1. Go to your Google Tag Manager variable settings.
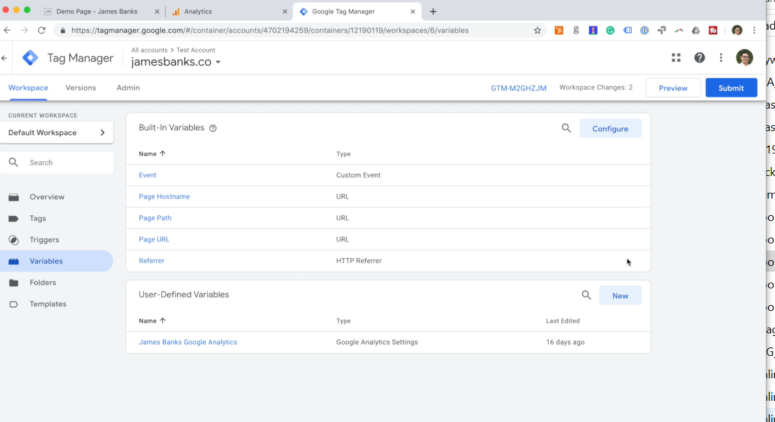
2. Open up the Configure section and to go to the Clicks area and turn all the Click variables on.
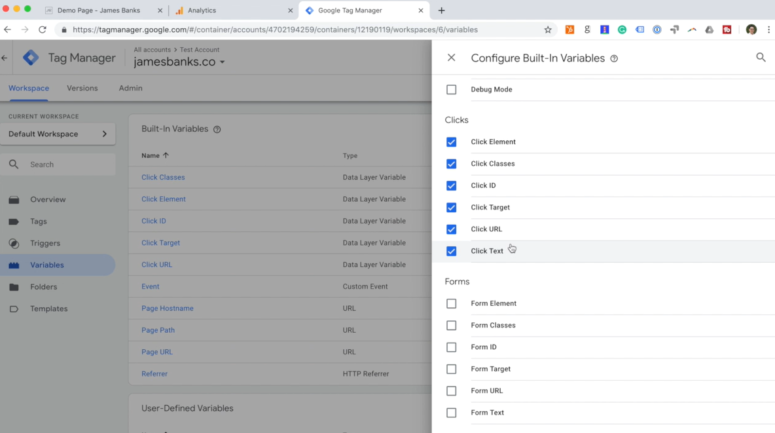
3. Once you’ve done that, go back to Tag section and hit the New button. Let’s call this tag GA – Click to call, where GA is for Google Analytics. The tag that you’re going to attribute this to is the Google Analytics tag. Since you’ve already integrated the Google Analytics script into the website and have set it up as variable, you simply just need to select. Now as the track type, you’re not tracking page views anymore. You want to be tracking event actions now, so click Event.
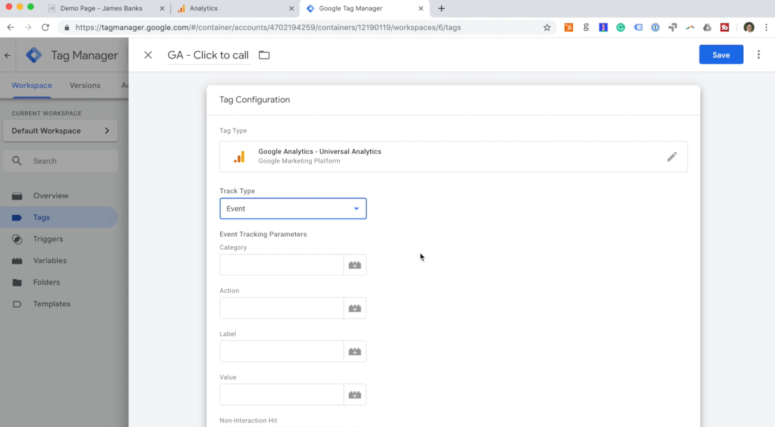
This is really the most important part.
To get it right, you have to match one hundred per cent exactly the category in action that you set inside Google Analytics. If you don’t do that, it’s not going to send this data into your Google Analytics report. That’s why you have to make sure you get this one hundred per cent correct:
- The category was Call.
- The action was Click.
- For the actual label section, what you need to do is to set the Page path as the label. This will pick it up and printed into the Google Analytics account. Leave the value blank, and everything else can remain the same.
Now to set up the trigger conditions, you’re actually going to need to create a custom trigger, too, for this to work. The reason being is you have to set a trigger that’s only going to fire this event when a user clicks on a click-to-call link on our website.
Let’s go ahead and set up this custom trigger:
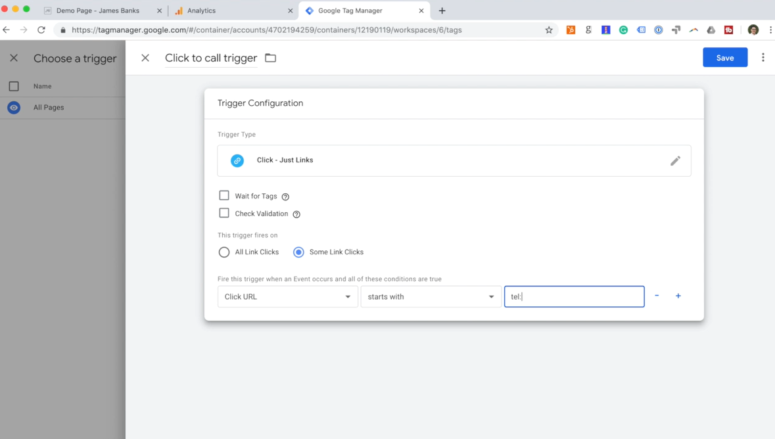
- Name the trigger Click to Call trigger.
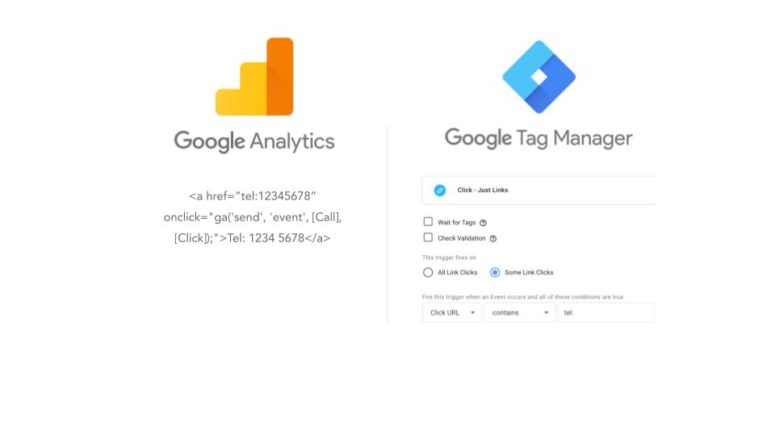
- For the trigger configuration, use the Just Links type because this trigger is only going to need to work on link clicks.
- Now. You need to set some validation to this trigger. Change the trigger firing conditions to Some link clicks and change the firing conditions to Click URL, Starts with, and tel:.
Why ‘tel:?’
Let’s go back to the website and open it up in the source code to see how it works. As you can see, if you look at the code that has tel:, there’s a <a href open tag to define a link class, then there’s tel: then a made-up phone number.
This is telling the browser that this number, 1234134, is a phone number. If you tried to tap this number on your phone, it will dial the number from your phone.
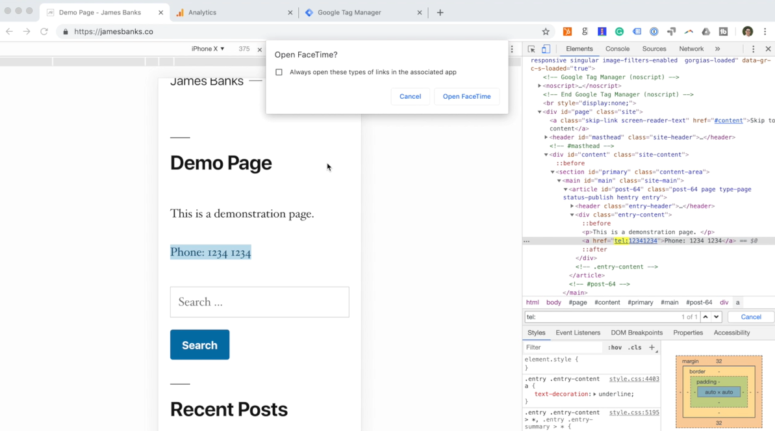
If you’re on your phone, the action will open up your actual download to call from. So as you can see here, this is the only place where you have tel: used to start links.
If you go back to Google Tag Manager, only links that start with tel: , which in your case only Click to Call links, will only fire your Google Analytics event on links that start with tel:
That’s how to set it up so it only collects the event data from these Click to Call links.
4. Now that you have that created, save it and save the tag you just created.
Now you’ve configured the trigger for the tag to fire, go ahead and now enable the preview mode inside Google Tag Manager.
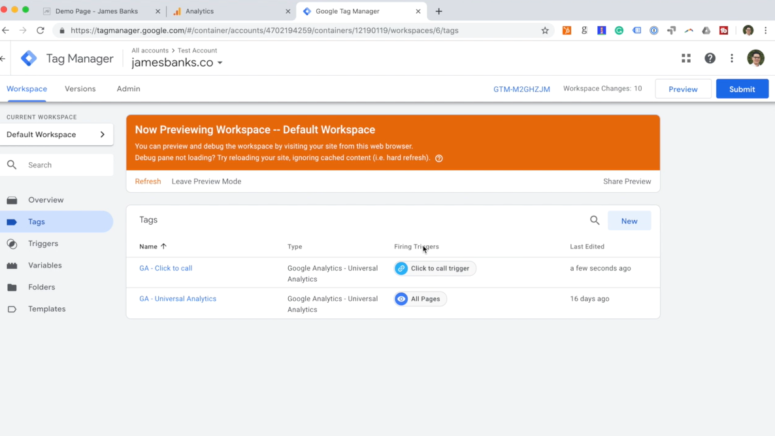
With a preview mode enabled, go back to the website and refresh the page. Go ahead now and click the click-to-call link. The moment you click the link, you’ll see a preview window has now fired the click-to-call tag successfully.

It’s best to double-check that your tag is working by going to Google Analytics, opening up the Real-Time report, then go to Events from where you should be able to see the event registered.
Keep in mind, once you’ve built your event tracking, it won’t show up in your conversion goal report inside Google Analytics for a little while.
If you want to learn more about Google Tag Manager and data-driven digital marketing, subscribe to our blog so you don’t miss out on any new articles.
Are you using Google Tag Manager for your business? I’d love to know what your thoughts are on the platform. Leave me a comment below!