
It is very important that your website loads as quickly as possible for your visitors. If your website does not load quickly then visitors will bounce away from your site and potentially find your competitor somewhere else.
Google has also stated that your website must load quickly and have made it one of their ranking metrics. They use this metric to determine where you are positioned on their search results.
Having a fast loading website is all about providing a good user experience to the user. If you provide a good user experience then they are more inclined to stick around and/or make a purchase or take the next step with you.
That is why if you want a website that works for your business then you need a fast loading website.
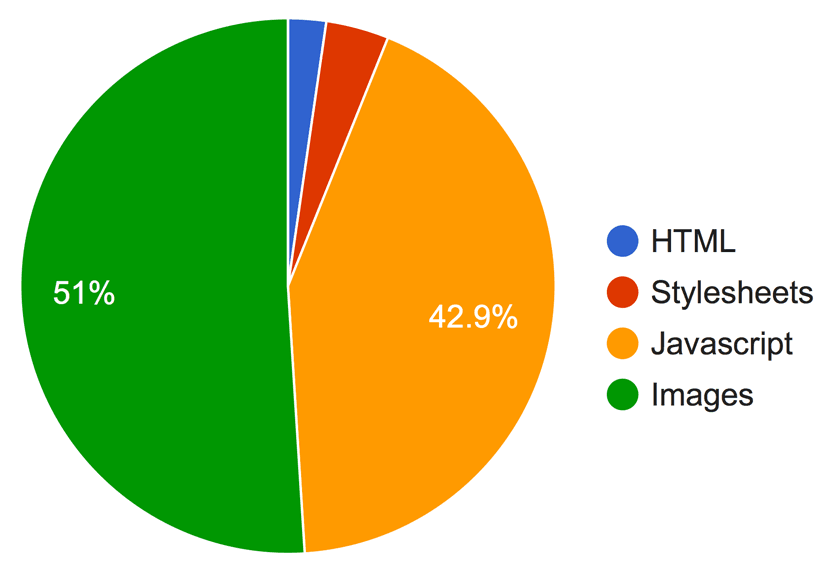
If you look at the breakdown of an average website, the majority of the files that make up the website are images. Here is the breakdown of our own websites homepage:
HTML – The text and code that makes up the structure of the website: 38kb.
Style sheets – The styles that make up the design of website: 65kb.
JavaScript – The scripts that are run to add enhanced interactivity as well as collecting analytical information with the website: 742kb.
Images – The pictures that are shown on the website: 885kb.
The combined amount of all the assets is 1730kb or just under 2mb.
The Javascript is a large size because we have a number of integrations to help with testing, measuring and optimising the site for conversions. Because of the integrations and the lack of control we have here, i’m not so concerned.
The number that I would be most concerned about is of course the images. We have already compressed these images for web as much as we can following the steps below. Before we compressed the images, they were several times larger in megabytes than what they are now.
They are now a total size of 885kb. This is still large but not too much of a concern now because we have a number of moving gif images. If they were just static non-moving images then they would be a lot smaller. Having a webpage of similar nature with image sizes larger than a megabyte is simply not acceptable.
Obviously the more images you add, the larger the size of total image sizes so it is important that they are all compressed as much as possible.
So how do you compress images for web?
As we have previously stated in our 99 ways to speed up your website ebook there are many ways to optimise your images for web. I will outline the most important ways to get the best results below.
Choose images that fit the context of the page
When you choose an image to use for your website, you have got to make sure that the image that you use will fit into the page. If for example you need a small thumbnail image that is about 150×150 pixels then you should choose an image that is sized accordingly.
It is not a good idea to use an image that you have just taken from your camera and upload it directly as the dimensions and file size of that image will be far bigger than required.
If you know the exact dimensions required for the image then it is best for you or your designer to compress the image to that exact size. That way you can run the image through a number of other compression tools stated below to get the best compression possible for that image.
If you do not know the exact dimensions that the image needs to be then you can always resize the image down to the maximum dimensions that it will need to be displayed on the website and let your website take care of the rest. What I mean by this is if an image will be sitting inside a “container” or specific part of your website then you can resize the image down so that it is no larger than this size.
WordPress does automatically create different sizes of your image for convenience but it doesn’t apply the same amount of compression that is possible to achieve through these tools. If you can, doing the below process is the best option for compressed images.

Resizing image and save for web in Adobe Photoshop:

Adobe Photoshop is a great tool for compressing for web. It is available on both Windows and Mac. The only downside is that it is a monthly cost to have. It gets the image about 90% of the way compressed.
- Open Photoshop
- Go to ‘File > Open’ to open the image (Mac Keyboard Shortcut: [command]+[o]).
- Go to ‘File > Export > Save for web’ to bring up the save for web window (Mac Keyboard Shortcut: [command]+[option]+[shift]+[s]).
- If the image is a photo or has great detail in it, choose jpg.
- If the image is a motion image, choose gif.
- If the image has very little differing colours/low levels of detail or requires transparency then use png.
- Adjust the quality level down to as low as you can before you begin to see degradation in image quality or pixelation starting to occur.
- Good quality levels are usually between 30-60% but can differ greatly depending on the quality, size and amount of colours in the image.
- Adjust the width of the image to whatever dimensions or max width you want the image to be.
- Click save and give the image a name.
- Make sure the images name does not have any spaces to ensure it is safe for web use. Replace all spaces with a ‘-‘ dash.
The image is now compressed for web but it can be further compressed using the tools discussed in the remaining part of this article.

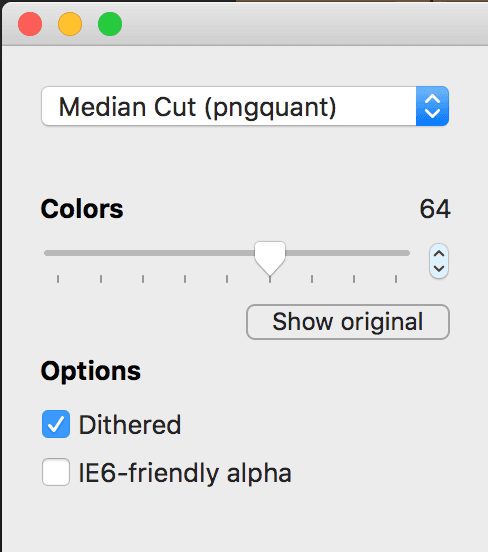
Compressing png images in ImageAlpha:
ImageAlpha greatly reduces file size of png images (including images with transparency) by applying a compression that discards unnecessary information in the image and converting it to a more efficient png format for web. ImageAlpha is a Mac only application. I have listed some Windows alternatives below.
- Open ImageAlpha
- Drag your PNG image into ImageAlpha
- Adjust the colours slider to a level just above the level where you notice degradation of image quality.
- Save the image as (Mac Keyboard Shortcut: [command]+[shift]+[s]).
The options you choose are again a matter of preference and can be tweaked to achieve differing levels of compression. Your aim is to get the compression as high as possible without sacrificing image quality. By adjusting the options, you can see the new compressed size that the image will be at the bottom.
Once you have compressed your images in ImageAlpha, there is one final step remaining to achieve ultimate compression.

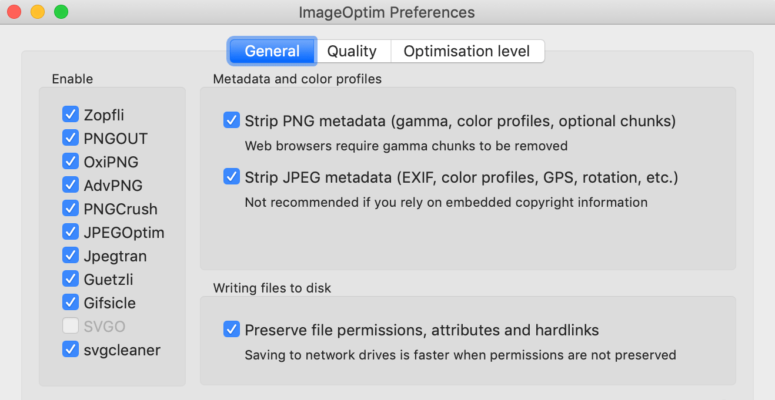
Compress images in ImageOptim:
Once you have compressed your images with the above mentioned steps, there is one more step that will squeeze 5-10% more compression out of it.
ImageOptim makes images take up less disk space and loads faster, without sacrificing quality. It has a few additional compression techniques, removes junk metadata and unnecessary colour profiles from the image file. ImageOptim is a Mac only application. I have listed some Windows alternatives below.
- Open ImageOptim.
- Configure settings (One time only needed)
- Drag your image into imageOptim.
Its as simple as that. If you have not completed the additional compression methods mentioned above then you may find that the image could be compressed by a lot more than 5-10%.
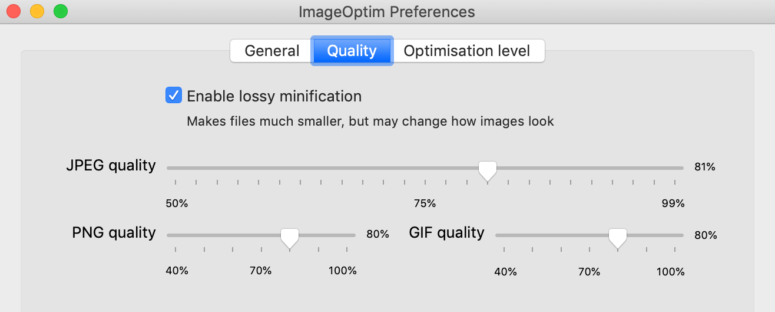
Make sure you have configured the settings of ImageOptim. This will ensure you have the best compression settings available. These are the settings I recommend:

Alternatives to the applications mentioned above.
Both ImageOptim and ImageAlpha are highly recommended but are Mac only tools.
If you cant get a hold of a Mac then there are Windows alternatives that can achieve similar results. Although I have not tested them out personally, I have heard good things from a number of applications including: Riot and PNGGauntlet.
There are also some web based alternatives such as tiny PNG, and shortpixel. Which tool you use is a matter of preference as well as which one compresses best for you.
If you are building websites for clients and they are not going to follow the above process or are simply to lazy then you can install plugins in WordPress to take care of about 70% of the compression needs. These plugins are either Smush or EWWW Image Optimiser. Having said that, nothing beats manual verification of compression so photoshop, ImageAlpha and ImageOptim will give you the best results.
If you have any suggestions id love to hear them.
If you used these tools and were able to compress your images, I’d love to hear your success stories in the comments below.