
One of the most important pieces to get right with your website is images. Images are one of the most important building blocks of the internet.
Did you know as of 2010, there are over 10 billion images indexed in Google?
Additionally, did you know that one in every three Google searches are for images?
That’s an insane amount of searches, and a massive opportunity to get more people to discover your business via Google image search.
How Google Handles Images
Image searches are one of the more common areas of Google search that people use.
As with any other form of Google Search, it is Google’s goal to provide users with the best and most relevant results to their search queries.
Ensuring that your website images abide by Google’s best practices for images will increase the likelihood of your website improving its search position ranking.
The first step for Google to figure out where to put your website in Google search is for the Googlebot to crawl.
The Googlebot is an algorithm that reads your website pages from top to bottom and figures out how useful your website is at solving the searcher’s problems and answering their questions.
Why Image File Names Matter
A common web design pitfall is placing important website text as images, instead of writing the text on the website page.
Although the Googlebot can read the file name and alt text of an image, it cannot read the text on the image.
Additionally, there is more margin for error in creating text that is too difficult to read and not accessible.
Google recommends keeping important text, such as your services or products, as written HTML text.
That way, you can ensure your website text maintains maximum accessibility while also being visible to the Googlebot.
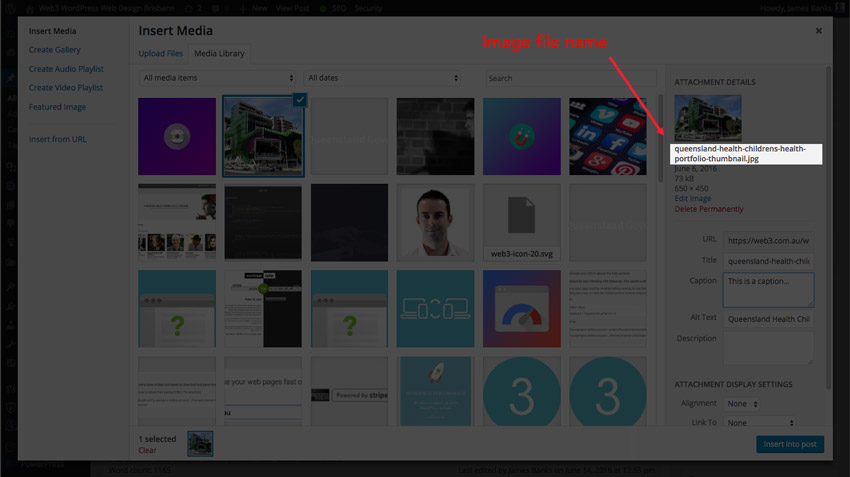
Although the Googlebot cannot read the text embedded on an image, it can still read the image’s file name and alt text attribute.
Google will look at the name of your image files for it to figure out what the image is about.
That’s why Google recommends giving your images descriptive and relevant file names, which will help your images appear in more relevant Google searches.
A straightforward example would be your website logo. Instead of calling the file logo.png, give the image more context by including your business name e.g web3-website-logo.png.
This will help improve your website’s rankings for brand-based Google searches.
The Importance of Alt Text Descriptions
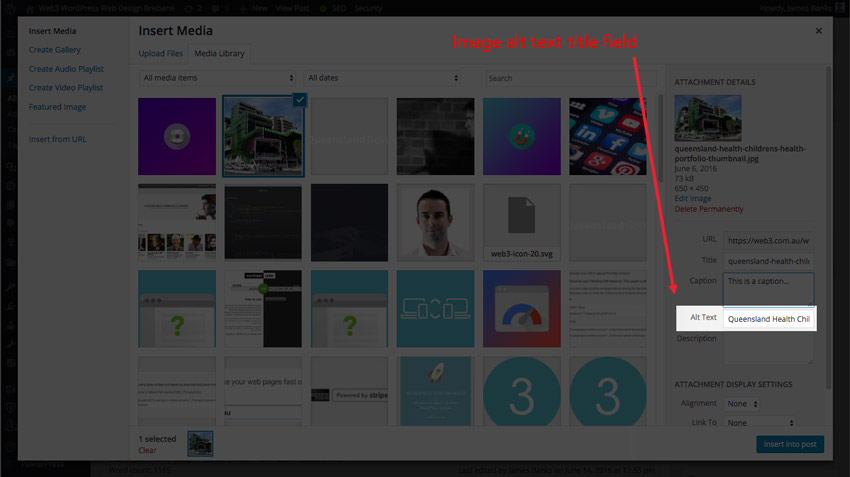
Your image’s alt text is one of the most important areas to get right when it comes to improving your website’s usability and search rankings.
Without getting too technical, alt text allows you to describe what your image is about.
In HTML code, it looks like this: <img src=”puppy.jpg” alt=”Dalmatian” />
If you’re running a WordPress website, you can set alt text by opening your image from the WordPress Media section.
It’s very important to include alt text for all visible image on your website.
Visually impaired users often browse the web with assistance from screen reading software such as JAWS.
Screen reading software picks up your image’s alt text, and verbally dictates it back to the user.
That’s why it is important to have descriptive and relevant alt text to increase the usability and accessibility of your website.
As it is Google’s goal to serve their searches with websites that are user-friendly and accessible, including relevant alt text for all images can help improve your website’s position in search rankings.
Finally, you should take care not to stuff your image alt descriptions with keywords.
Always think: “How easy would it be for my users to understand what my webpage was about if they could not see any images, and only see the alt descriptions”.
Don’t Overlook Image Captions
The Googlebot will not only look at your image’s filename and alt description in its attempts to figure out what your image is about.
It will also look around your image for clues on what your image is about.
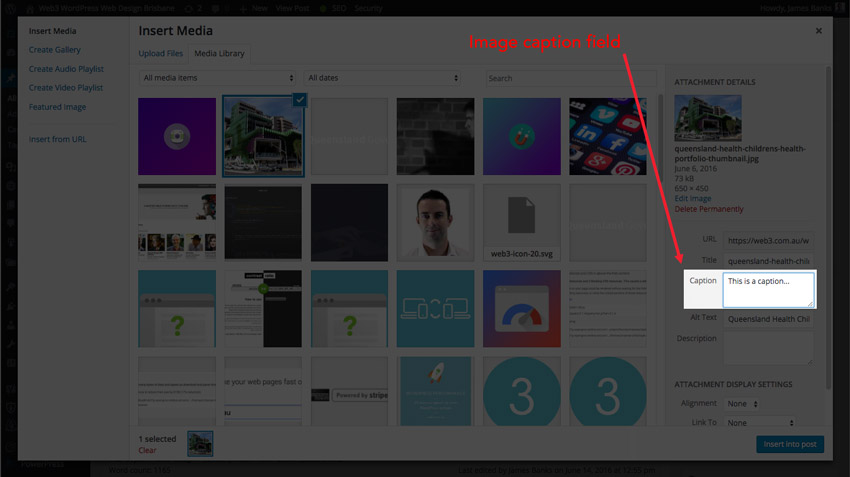
That’s why it’s a best practice to include detailed and useful text captions to accompany your images.
You can easily set image captions in WordPress by opening the image from the media section.
In some cases, it wouldn’t make sense to include captions along with images.
For example, on a dedicated lead capture landing page, it wouldn’t make sense to write a caption for each image on that page.
Instead, Google will look for text located close to the image in order for it to figure out what the image is about.
That’s why it is important to use images that are in context with the text that surrounds the image.
For example, it wouldn’t make sense to have an image of a boat on a page about cats.
Your Secret Weapon: The Image Sitemap
Google recommends including images as part of your website’s XML sitemap.
Your website’s XML sitemap should be submitted to Google’s Search Console, which prompts Google to index your images in Google Image search.
This step is important as it allows users to better discover and click through to your website through Google Image search.
If your website is running on WordPress, the easiest way to generate an image sitemap is through the WordPress SEO plugin by Yoast.
Follow the steps below to submit your image sitemap to Google Search Console using the WordPress SEO plugin:
- Open the XML sitemaps section of the WordPress SEO plugin
- Make sure the general XML sitemap functionality is enabled
- Select ‘In sitemap’ for the Post, Page and Media options
- Depending on how your WordPress theme is configured, you may have a few more options listed below. A common additional option is ‘Portfolio’. If you wish to have your website’s portfolio pages indexed in Google (you should), enable this as well.
- Click on the ‘General’ tab from the XML Sitemaps section, and click on the XML sitemap button. This will open your website’s XML sitemap. Copy this URL from your website browser as you’ll need it for the following steps.
- Go to Google Webmasters and log into your website’s Search Console. If you have not set up Search Console for your website, you can follow this handy setup guide from Google here.
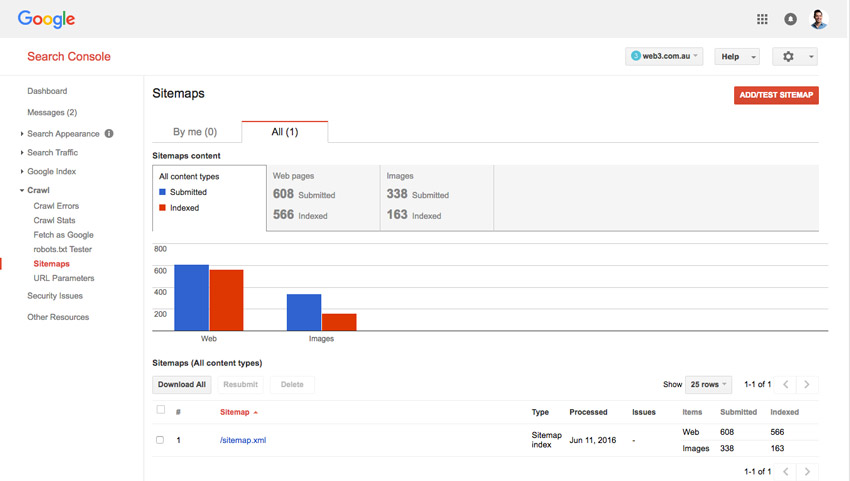
- Open up the ‘Crawl’ menu from the sidebar and click on ‘Sitemaps’. Click on the ‘Add/Test Sitemap’ button
- Paste in your XML sitemap URL into the window and click the ‘Submit’ button. Your XML sitemap URL should read something like ‘sitemap_index.xml’.
- If successful, you should see the graphs and data tables on the sitemap page populate with your website’s indexable pages and images.
Do’s
- Give your images descriptive and contextual file names
- Give your images descriptive and useful alt titles
- Write descriptive and relevant captions to go along with your images
- Submit an image sitemap via your Google Webmaster Search Console
Don’ts
- Use images in place of HTML text
- Spam your image files names with keywords
- Publish images with no alt titles
- Not include images in your website sitemap submission to Google Webmaster Search Console
Source: Google Webmaster Quality Guidelines – Hidden text and links.
How do you go about managing images on your own website? Leave a comment below and share with us your approach.
Another good one, James.
The plugin Media File Renamer lets you rename your image files after they are loaded, which is useful sometimes, although it doesn’t redirect old file names to new file names, so it’s best to do the renaming before publishing posts with the renamed images.
Might be worth mentioning speed impacts of images. WordPress now serves smaller image sizes based on the browser, and compresses those smaller images, but it’s worth looking at plugins like EWWW Image Optimizer to get the most compression and speed increase, because every second counts when pages load.
Importantly, the images in the theme should be optimised too, but if they aren’t compressed, EWWW finds them and compresses them, which I’ve found to yield the biggest improvements (those large backgrounds and high quality logos can take time to load).
Thanks Gal and thanks for sharing your approach! Image Filesize is important so I’ll probably flesh this guide out to cover this. I haven’t used EWWW before but will have a look at it. I tend to take care of compression offline before bringing the file online, however I can see the benefits of automating this.
Very informative blog! Thanks for sharing it!
Thanks Dave! Glad that you enjoyed it.